REB Member User Guide Overview
The REB Member User Guide explains the key features and functionality you will use when you are assigned to review an REB application.
Reminder: Bookmark the EthOS Hub as your main portal for all things EthOS!
Background
About EthOS
EthOS (Ethics Online System) is the University of Guelph’s Research Ethics online application, review, and approval platform.
This platform provides several benefits for the research community to enhance the efficiency and integrity of the ethical review process, including:
- dynamic form navigation
- collaboration opportunities
- document management features
- real-time visibility to application status
- automated notifications
EthOS launched in July 2024 as part of an enterprise-wide initiative to improve research administration tools and processes. U of G’s Research Administration Information Management System (RAIMS) is a strategic initiative with a longer-term roadmap to implement multiple department-specific ethics solutions that support and empower our research community. (Researchers will see the RAIMS acronym referenced periodically throughout our user support materials.)
EthOS uses Infonetica’s Ethics Review Manager software. Infonetica specializes in research management, ethics management, ethics approval, and compliance training solutions.
EthOS is supported and maintained by U of G’s Research Ethics office. We are here to guide and support our research community at every step.
Available EthOS Forms
EthOS replaces U of G REB forms and supplements previously completed in Microsoft Word.
Use EthOS for all main (standard) REB applications (including Multi-jurisdictional and Request for Exemption applications) and Statement of Intent applications.
Amendment requests, annual renewals (continuing Ethics Review), event reports, and study closures are also processed through EthOS.
Note: As of September 23, 2024, all active protocols approved prior to EthOS were made available in the system as legacy (pre-EthOS) forms.
REB Submission & Review Process Workflow
The implementation of EthOS does not change the overall review and approval process for research ethics applications. The Research Ethics office continues to coordinate all steps, ensuring compliance with the Tri-Council Policy Statement, but the workflow is streamlined and more efficient using the electronic system.
Initial Steps and Important Reminders
Account Setup
All REB Members have had their accounts created using the email on file with the Research Ethics office.
If you are an external user, you will need to set up a password during your first log-on. Follow the system prompts. If you have any issues accessing the system, please email RAIMSsupport@uoguelph.ca.
Internet Settings
Pop-Ups
- For full system functionality, ensure that EthOS pop-ups are allowed.
Supported Browers
- Microsoft Edge
- Google Chrome
- Mozilla Firefox
- Apple’s Safari
Note: Using Microsoft Edge may reduce multi-factor authentication (MFA) prompts.
Mobile Compatibility
EthOS is not optimized for mobile use. We recommend using EthOS on a desktop or laptop browser only.
If you encounter any browser or display issues, contact RAIMSsupport@uoguelph.ca.
Logging In
Tip: you might find it helpful to bookmark the EthOS URL.
REB Members and Research Ethics staff will use a Reviewer site to access and process their assigned applications.
From the EthOS homepage, there are two ways to log in:
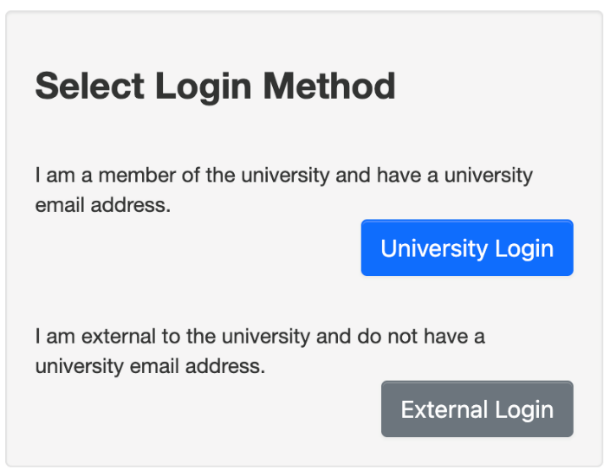
- Click on the University Login button if you have a University of Guelph email address (@uoguelph.ca) or Guelph-Humber email address (@guelphhumber.ca). Use your existing credentials.
- External community members should click on the External Login button; enter your email address that is on file with the REB and follow the prompts to reset your password (if this is your first time accessing the system).
Timeout Settings
EthOS will automatically log out applicants after 30 minutes of inactivity. You will receive a one-minute warning notice to prompt you to stay logged in if needed.
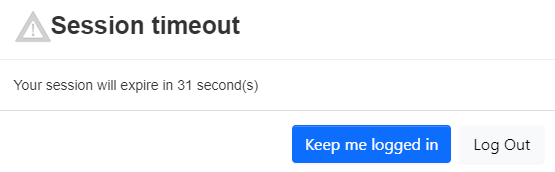
If you have stepped away and return after EthOS has timed out, you will see this message:
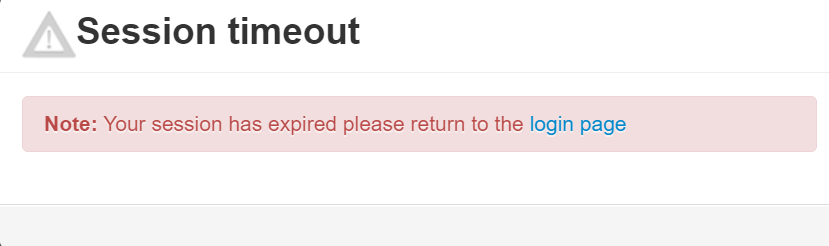
Follow the hyperlink in the Session timeout notification window to log back into EthOS.
Saving Form Data in EthOS
EthOS does not autosave in the same way that you may be familiar with in other cloud-based applications. For REB members, if you are in the process of writing a long comment and need to step away from your computer, we highly recommend manually saving frequently in case of interruption. The Save tile in your actions pane triggers a manual save.
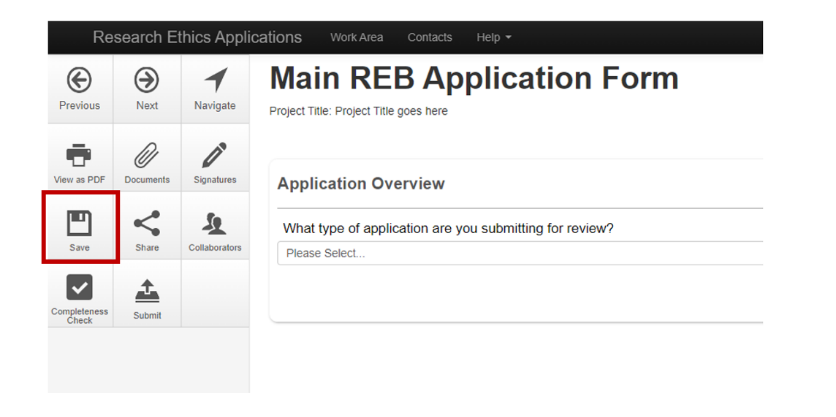
When you manually save your data, EthOS displays a green Save Complete message in the menu bar.
Note: EthOS will not automatically save when you use your browser back arrow to return to a previous screen.
Basic Navigation
EthOS Dashboard and Work Area
When you log into EthOS, you arrive at a main dashboard, commonly referred to as the Work Area. You can think of your Work Area as your home page. As a dynamic system, the EthOS dashboard continually adjusts based on activity in your reviewer account.
EthOS uses tiles to organize the activity or information you will need as a reviewer. When you first log in, your tiles may only have green zeroes if there are no applicable records for that tile yet. As you complete tasks, counts will update dynamically.
Red values indicate the number of applicable entries within that tile. Green values indicate that no action is required.
Tile counts update every ten (10) minutes but you can manually trigger an update by clicking on the blue Refresh link beside each tile.
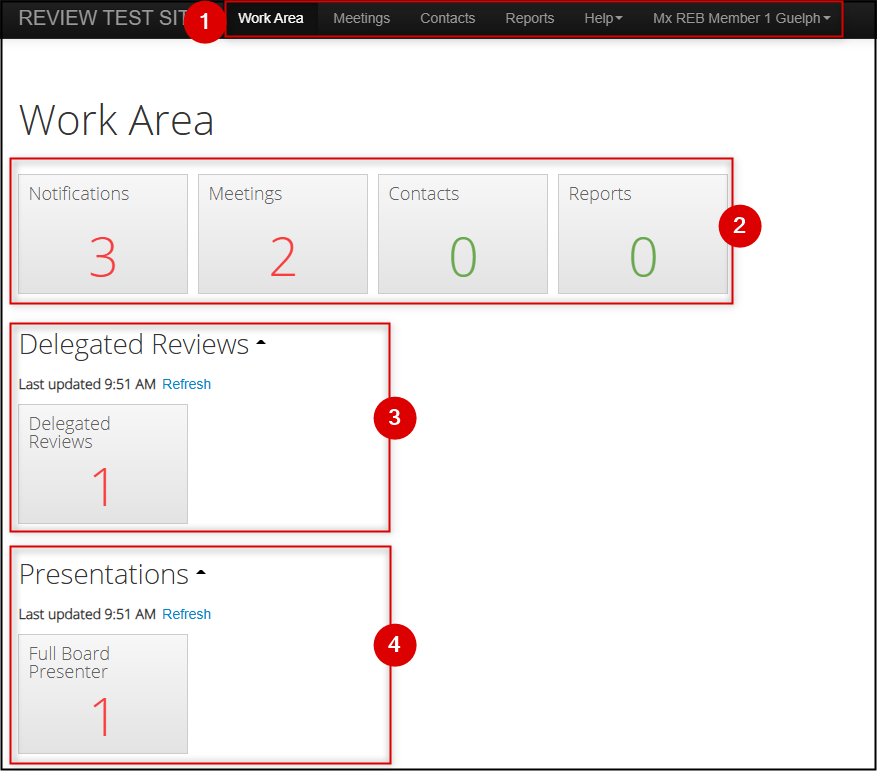
- Navigation Menu Bar and User Settings: The navigation bar appears on every page. Use it to quickly jump back to your Work Area, Help, and User Settings (top right).
-
Work Area Top Row: only two of these tiles are in use at this time (Notifications and Meetings); for more information see Using your Notifications Tile and Preparing for a Full Board Meeting
Note: please ignore the Contacts and Reports tile for now. However, if you have a report or data information need, reach out to RAIMSsupport@uoguelph.ca and we can compile the information for you.
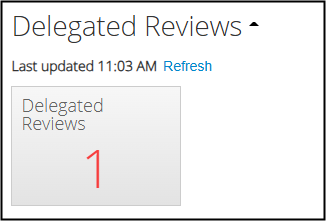
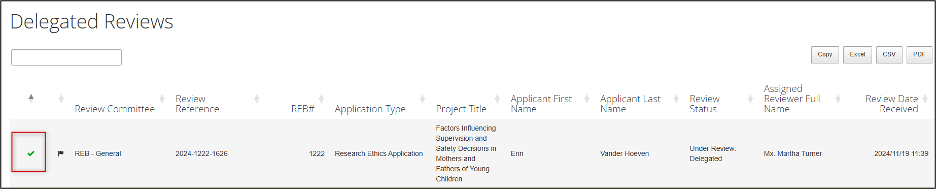
- Delegated Reviews: any applications that have been assigned for your review as an REB member will appear here; for more information see Completing a Delegated Review
-
Presentations: any applications that you have been asked to present at an upcoming REB meeting will appear here; for more information see Preparing for a Full Board Meeting
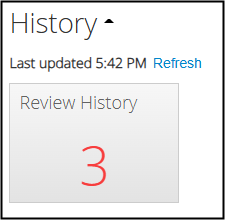
The History Tile
A History tile will also be visible on your Work Area once you complete your first delegated review and/or other assigned tasks. The History tile is updated as you complete your required action and/or after the Ethics Office moves the application to the next step in the workflow. No action is needed for contents in the History tile.
Using your Notifications Tile & Notification Centre
The Notifications tile contains the automated messages addressed to you as they are generated throughout a project’s lifecycle. REB Members also receive an email version of each major notification, which, for most users, will be your preferred trigger to enter EthOS and complete an activity. However, the Notifications tile has the equivalent history so you do not need to rely solely on email notifications (or vice versa).
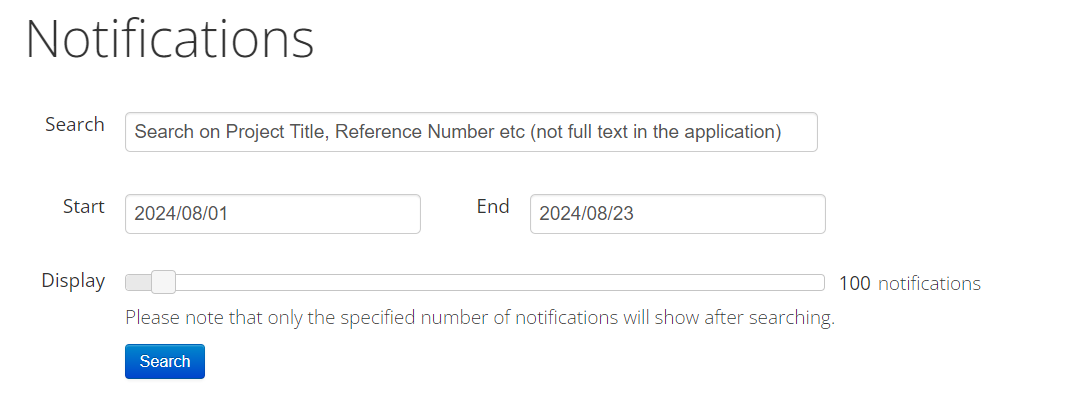
Click on the Notifications tile to open the Notifications Centre. This area is like an email inbox displaying all system notifications and any attachments throughout your various reviews.
Here you can search on Project Title, Reference Number or any of the metadata text displayed in the various columns. You can also search within a date range.
Note: You cannot conduct a full-text search on the content of an application. However, you can download a PDF of the application and search within it outside of EthOS. (This step is further explained in the Timeline View section later in this guide.)
Notification messages can then be managed in much the same way as an email inbox:
-
Click on the top-level check box to bulk delete notifications or mark all as read
- Note: deleting a notification cannot be undone (unlike an email inbox); be sure that you will never need to reference the notification again if you opt to delete it
- Sort columns
-
Find notifications that include attachments
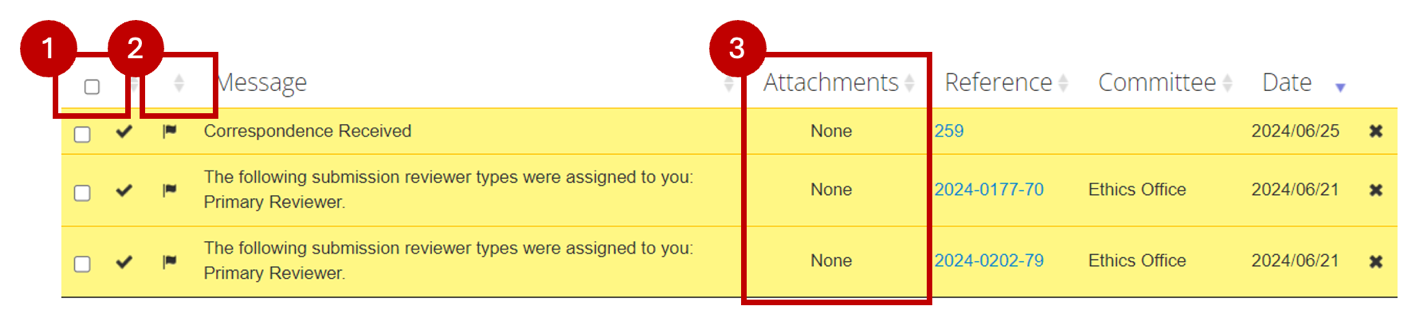
- Click once on the message title to open the notification and see its contents
-
To open attachments included with a notification:
- From the notification row, click on the Paperclip icon, then click Download
- Or, from within the message, click View Form to access that specific form
Moving Between EthOS Screens
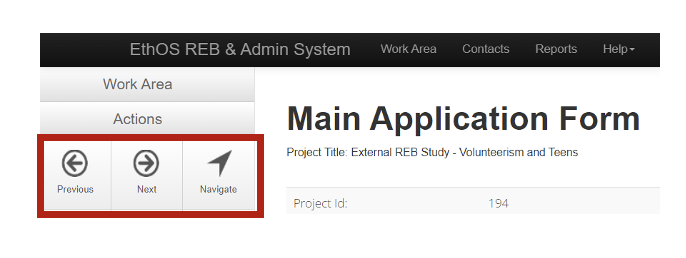
As you work in EthOS, return home to the Work Area by clicking on the EthOS title or the Work Area title in the Navigation Bar. While reviewing an application, you can move through pages using the Previous, Next, and Navigate action tiles.
-
Note: Previous and Next move you through the application one page at a time; Navigate returns you to the main list of application sections where you can jump to different areas of the form as needed.
-
Using your browser back arrow will result in a loss of any unsaved data on a screen. If you must use the back arrow, make sure you click the Save tile first!
- Reminder: EthOS does not autosave in the same way other cloud-based applications do (see more information in the Initial Steps of the Getting Started materials)
Review Process Overview
Completing your review in EthOS involves the following steps:
- Being notified that your review is required
- Finding/accessing your assigned application
- Understanding where each application is in its overall lifecycle (is it a new submission, an amendment to a previously approved application, etc.)
- Reviewing the contents and adding your comments
- Indicating your decision/recommendation and providing any final overall comments
- Marking your review as complete (done)
This basic process is the same regardless of whether this is the initial application or an amendment.
Video Recap of Reviewing an Application
This video summarizes the key steps involved when reviewing an REB application in EthOS. Each of these steps is explained in more detail in the subsequent sections of this User Guide.
Accessing the Application Assigned for your Review
REB Member (reviewer) involvement starts after the Research Ethics Office has completed the pre-review and determined which path the application will follow.
Applications may follow either a Delegated or Full Board Review workflow.
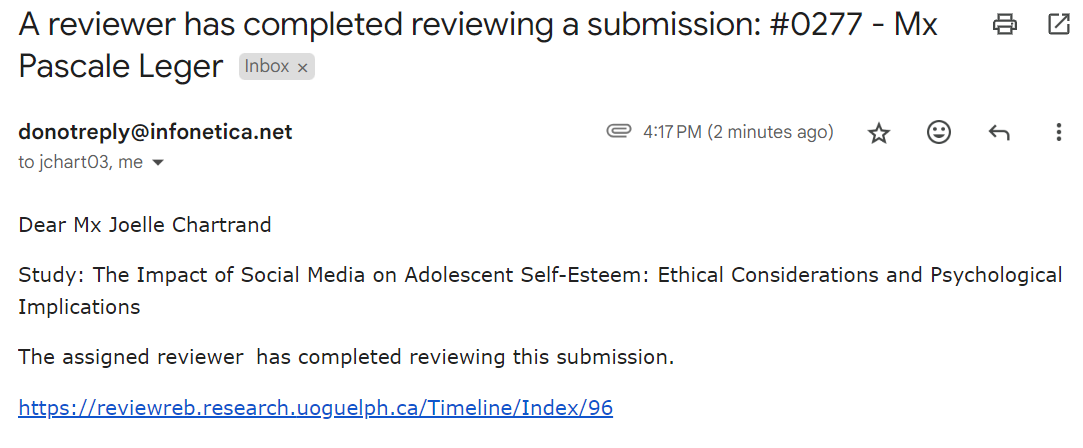
If you are assigned as a Delegated Reviewer, REB Members receive an email and an EthOS system notification where you can link directly to the application. The application is also visible in your Delegated Reviews tile.
- Note: Applications undergoing Full Board Review can be accessed via the Meetings tile, or your Presentations tile (if you are named as the presenter). For more information, see Preparing for a Full Board Meeting.
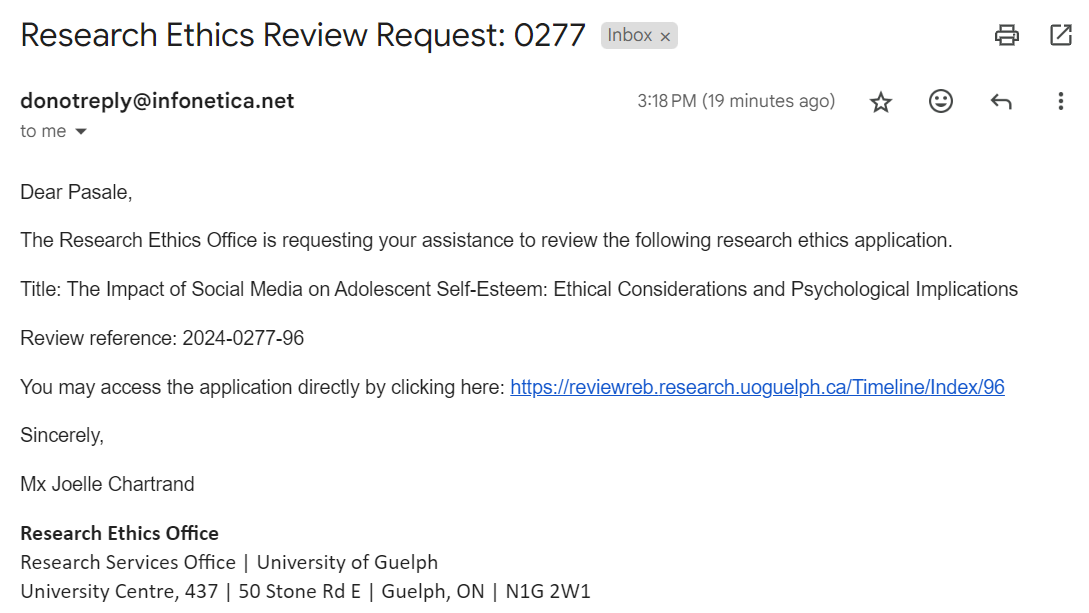
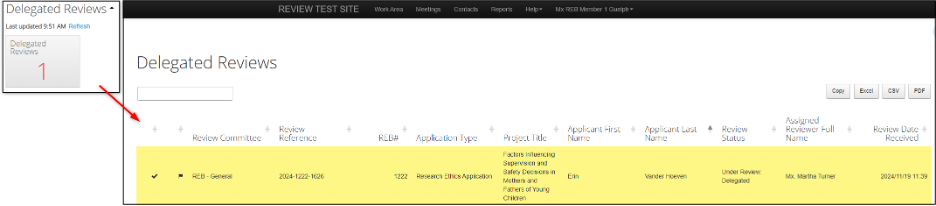
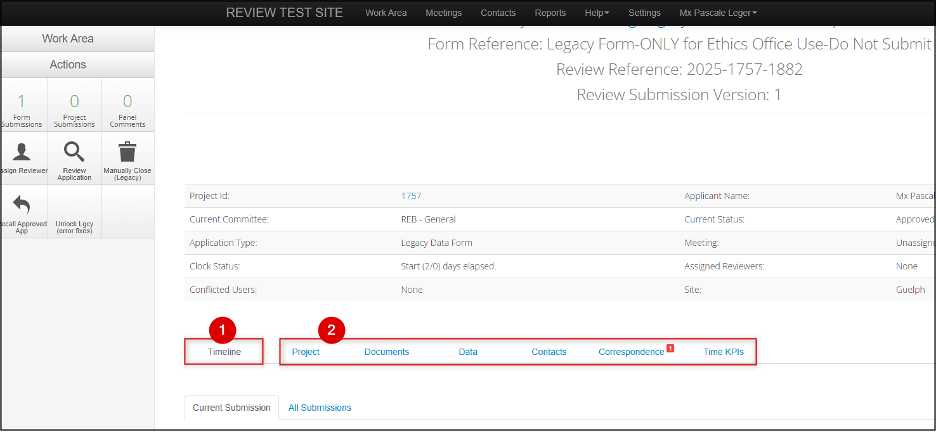
To open the application from either the email link or Delegated Reviews tile, click once on the reference title to open the Timeline view.
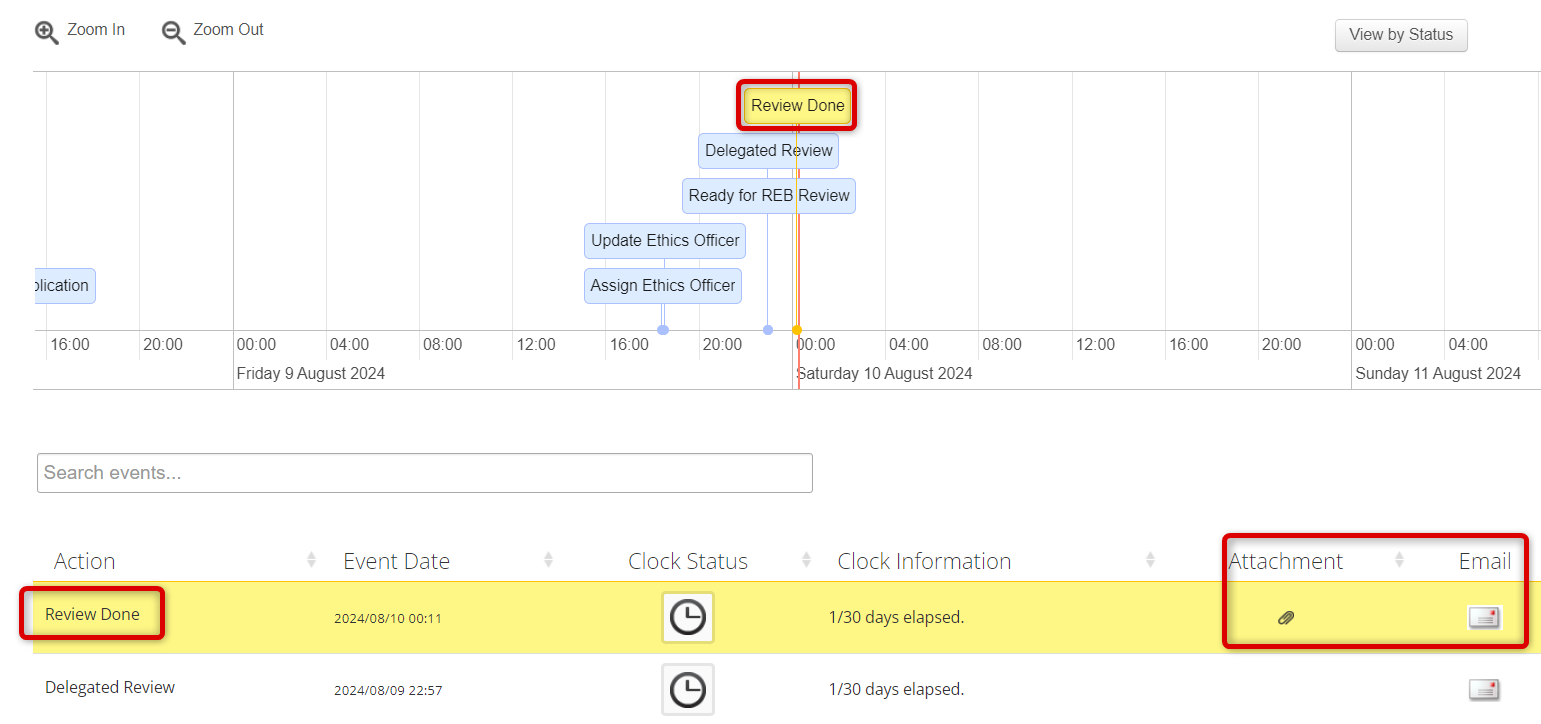
Timeline View
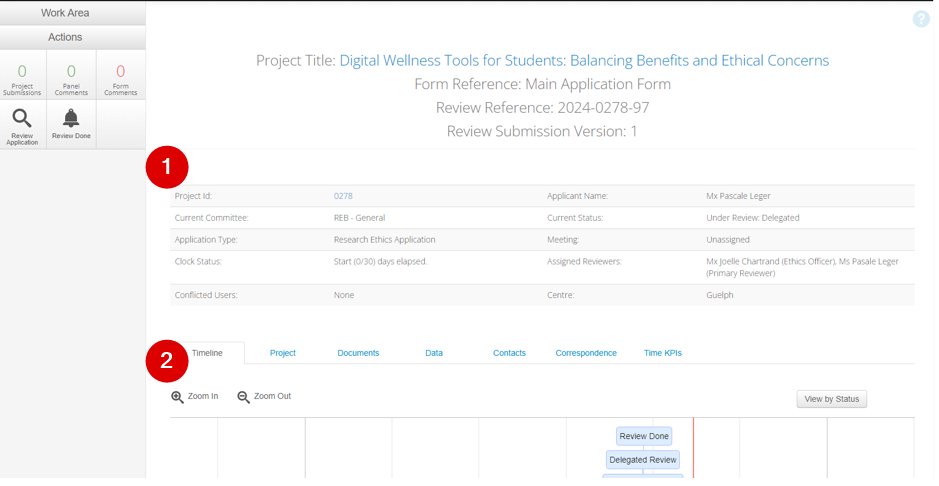
The Timeline view is your best friend in EthOS! It will display the latest status and sequence of events that have been completed against the application. It is best practice for reviewers to visit this page to gain a better understanding of the application's lifecycle. Any required action (i.e. opening the application to review it and marking it complete) can only be triggered from this Timeline view.
- At the top of the view, the Header table shows various details such as the application type, the committee it has been assigned to, the status, and who the assigned reviewers are.
-
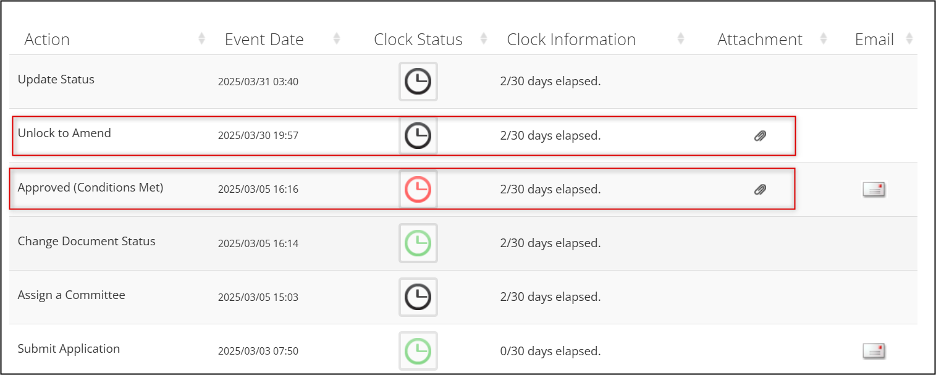
Below, the Timeline tab displays all the actions completed for the application throughout its lifecycle. You can zoom in and out to change the timescale and scroll forward and backward through the timescale as needed.
-
At the bottom of the page, you can see the chronological sequence of events in a list and use the search bar to look up a specific event.
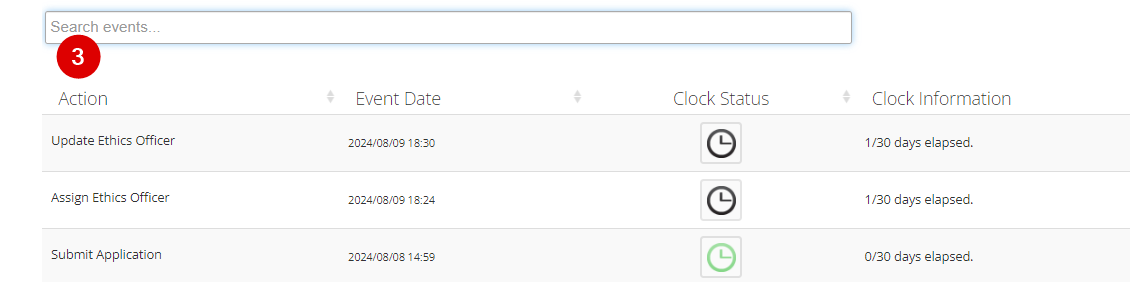
Timeline View Tabs
The Timeline tab is the main (first) tab, but you can access other details about the application from this screen also.
- The Timeline tab displays the timeline information
-
Toggle through the other tabs to view:
- Project: EthOS uses the term ‘project’ to refer to the complete set of forms any REB protocol may involve, including a main form application, a renewal, event report etc. The project is the overall parent, the Statement of Intent, Main Form, or Legacy Form will be the first branch, and post-approval events (renewals, etc.) become subbranches (subforms) on the project tree. For more information, see Before you Begin a Review: Navigating the Project Tree .
- Documents: All documents uploaded as a part of the application process. This tab is especially helpful if you wish to review any specific documents before beginning your review (e.g., the application itself or the consent form). You can download all or single documents. If you wish to do a full-text search on the contents of the application, download the file from here and search it outside of EthOS.
- Contacts: If the application has named study team members, they will be listed here. These individuals can also be found on the Personnel section of the application.
-
Correspondence: Please do not use this feature to correspond directly with the research team. You can review the application’s correspondence history if you wish.
- Note: Where you see a red superscript number on the Correspondence tab, is represents the number of unread messages per user. This only means that you have not seen the message(s) but does not mean that the correspondence has gone unread (or unanswered) by the Ethics Office. Since REB Members should not be writing correspondence.
- Note: As with the Correspondence tab, the Data and Time KPIs tabs are used by the Research Ethics office staff only.
Returning to the Timeline View
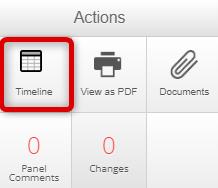
Wherever you are in your review of the application, you can always return to a Timeline view using the Timeline button in your action pane on the left of your screen.
Navigating the Project Tab
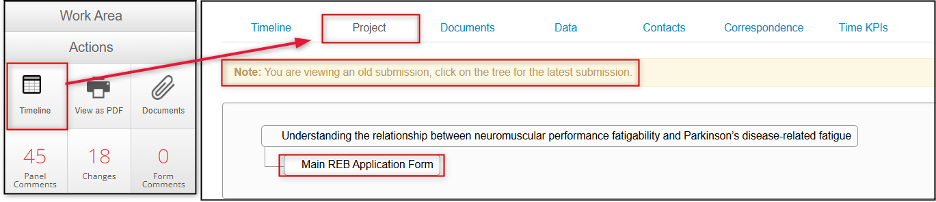
When you launch any application that has been assigned for your review, it will take you specifically to the appropriate form and/or latest version in EthOS.
However, there are times when you may wish to look at or understand what other forms are included in the overall submission file, perhaps as additional context before your review of a specific form. In these cases, it’s important to understand how to navigate the hierarchical Project Tree in the Project tab.
From the Project tab you can access all submission versions and subforms of the entire application file.
From any application, choose Timeline View → Project tab
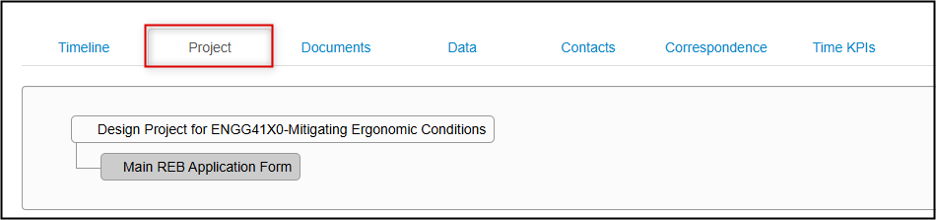
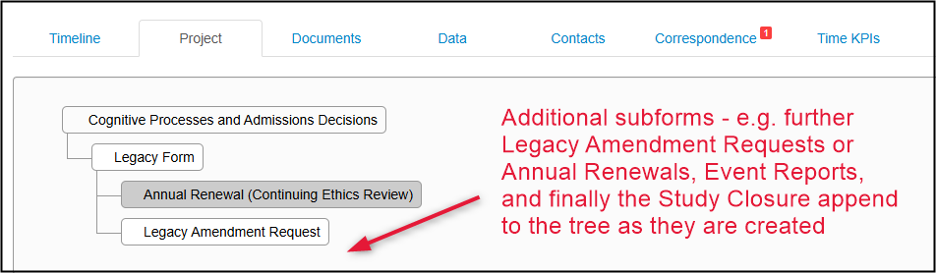
The Project tree is a hierarchical structure. The very top ‘node’ will always be the study title. The first branch will then appear as either:
- A Main REB Application Form (for all EthOS-generated applications), or
- A Legacy Form (for applications that were created outside of EthOS)
Project Trees and Subforms
Below the first form branch, the application can extend to include any subforms as the overall study progresses. The following are subforms in EthOS:
- An Annual Renewal (Continuing Ethics Review)
-
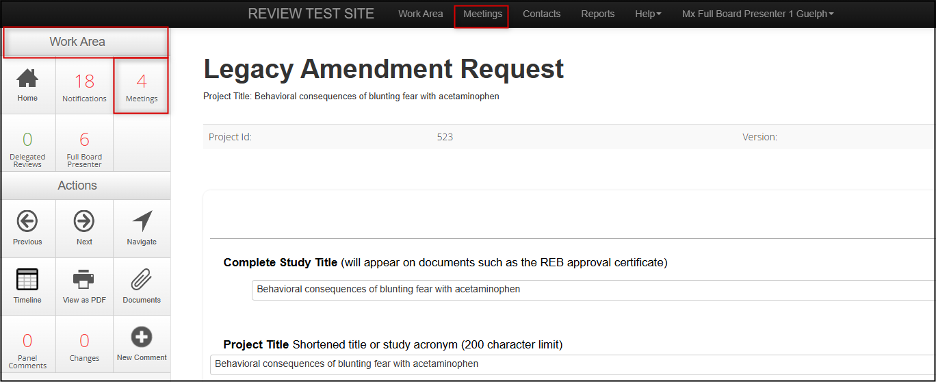
Legacy Amendment Request
- Note: an Amendment request for an EthOS-generated application is not considered a subform but is instead a resubmission; for more information, see Reviewing (Re)Submission History in EthOS-Generated Forms
- An Event Report (not shown in screenshot)
- A Study Closure (not shown in screenshot)
Subforms are added to the tree in the order of which they are created. The lowest branch on the tree will be the most recent form or subform.
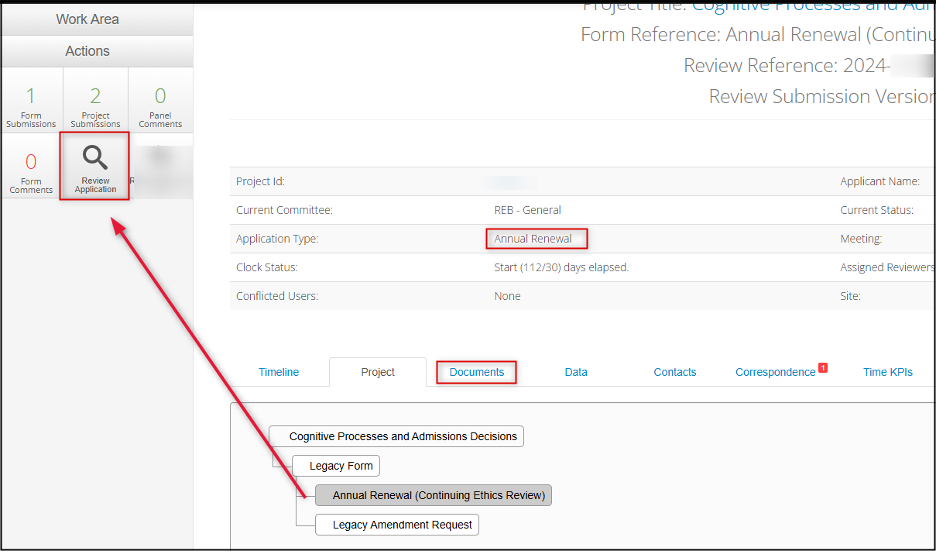
As you click through the Project Tree, the other tabs (e.g. Documents) and header details will dynamically update to be relevant to that particular form and branch.
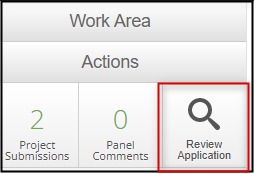
Tip: If you wish to read the subform in more detail, click on Review Application to open its contents.
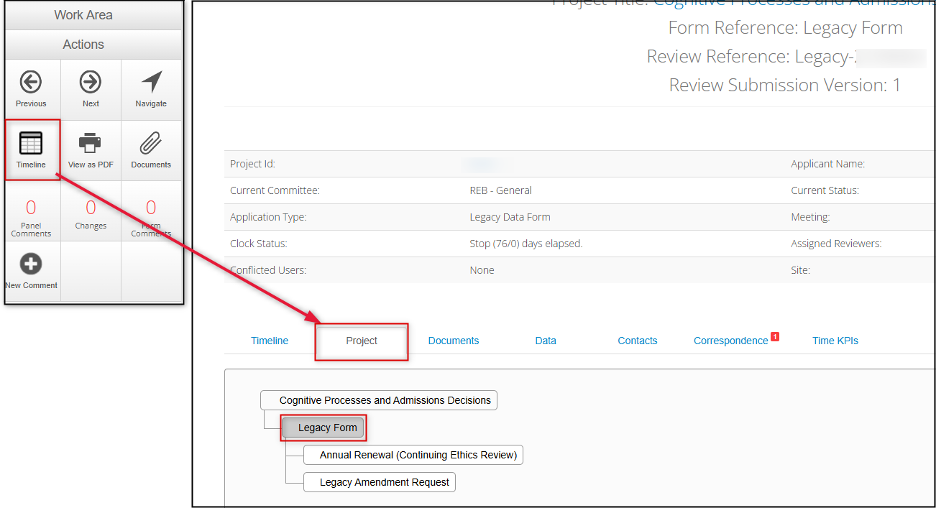
Returning to the Project Tree / Moving to Another Branch
If you have clicked into a subform, you must return to the Timeline view and open the Project tab again to navigate to a different branch. This can take a little practice but remember: the Timeline view and the Project tab are key features designed to help you work your way around these dynamic forms.
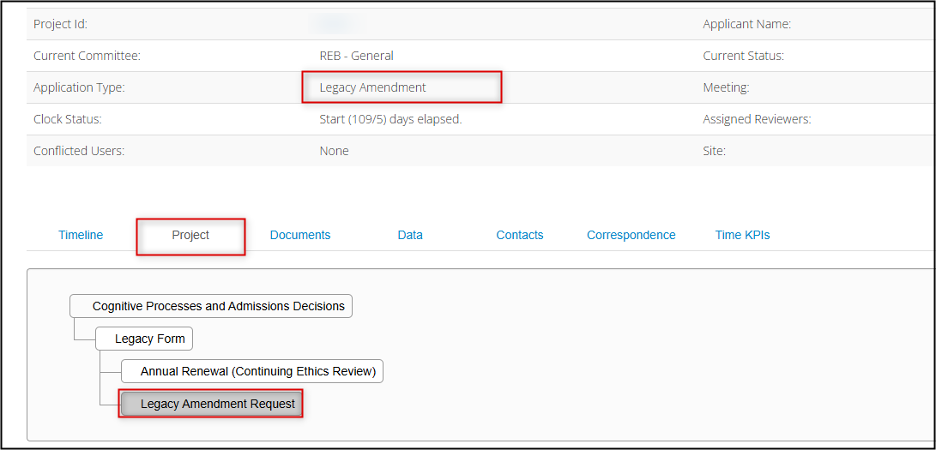
Finding the Latest Submission – Legacy Applications
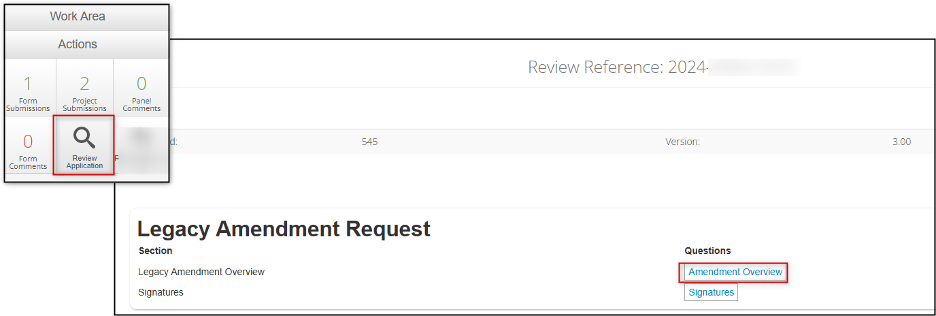
Depending on the assigned review scenario, you may need to orient yourself to the broader status or background of the overall study first. For legacy applications, the approved Legacy Amendment Request subform on the Project tab will always be the most recent submission. (In the case of multiple Legacy Amendment Request subforms, the lowest branch will be the most recent).
To check to see if a Legacy Amendment Request exists and access it if so:
- Make sure you are in a Timeline view and open the Project tab
- If you see a subform for a Legacy Amendment Request then you know that the original submission has been updated
-
Click once on the Legacy Amendment Request subform branch; notice that the header level details should now align to the subform you have selected
- Click on the Legacy Amendment Request subform to open that form’s Timeline view
-
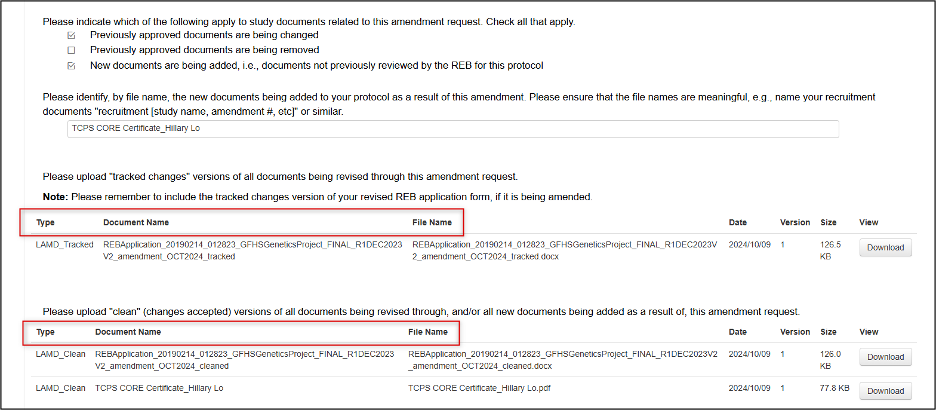
Click on the Review Application action and then expand the form questions to read through the amendment details
-
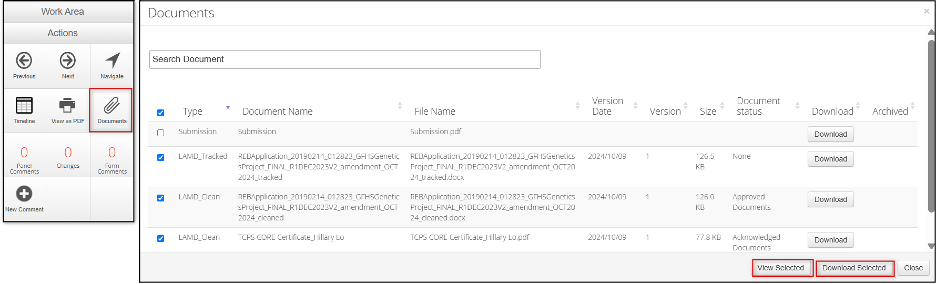
At the bottom of the page, download the clean version (or tracked if you prefer to see the change history) of the original submission file or any other changed documents
-
Alternatively, open the Documents tab from the Timeline → Project tab or from the actions pane and choose the documents you wish to download
- Remember, to return to a different form or area of the overall project, you must click the Timeline action, re-open the Project tab, and then navigate to that form (see Returning to the Project Tree / Moving to another Branch )
Latest Version and Submission History in EthOS-Generated Forms
Any form that was created in EthOS can go through multiple resubmissions depending on the review scenario.
The most common trigger for resubmission(s) of an EthOS form are:
- The Ethics Office requires corrections as part of the initial pre-review clarification (PRC)
- Modifications are requested after a Delegated or Full Board review (this is also known as response to REB feedback)
-
Some aspect of the study has changed, requiring an amendment to an approved study (only in the case of EthOS-generated main form applications is this considered a resubmission)
Note: Amendments to legacy applications use a separate subform instead. Therefore, a legacy amendment request will never ‘count’ as a resubmission because a subform is an additional form within the project, not a resubmission of the main form.
Depending on the review scenario, there could be repeated cycles of resubmissions. For example:
An initial Main Form could go through three submissions before it is approved:
- Initial submission
- The resubmission after the applicant corrects errors found in the PRC
- The resubmission after the applicant responds to REB Feedback
Number of form submissions: 3
And after approval, resubmissions can continue:
- A resubmission to unlock the form to amend an aspect of the study (e.g. change in consent process)
- A resubmission in response the REB feedback which is then approved
- Etc…
Number of form submissions: 5
Each time a form is resubmitted, the previous version is considered superseded.
When you open an EthOS-generated form, it will always default to display the latest (most recent) version.
Navigating the List of Form Submissions
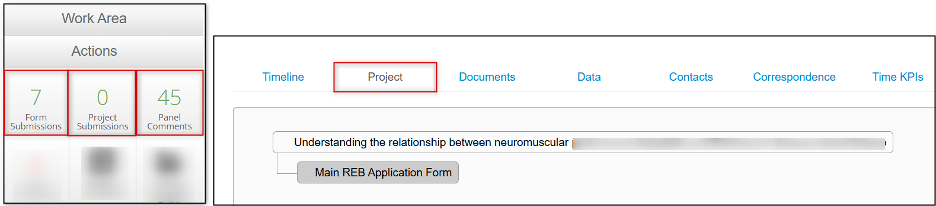
Each time you launch a form, the number of submissions is displayed in the Form Submissions tile in your actions pane.
This data is particularly helpful when displayed alongside the Project tab.
Other data, such as the total number of project submissions (the number of different forms submitted as part of the overall study) and total panel comments, is also displayed.
Form Submissions
This tile displays the number of times that the ‘top node’ form (e.g. a Main Form) has been resubmitted. Another way is to think of this number as how many submission versions of the form exist.
Opening the Form Submissions tile displays the version history with the most recent being on the top, but you can click on the Submission Date title to sort to have the oldest submission on top.
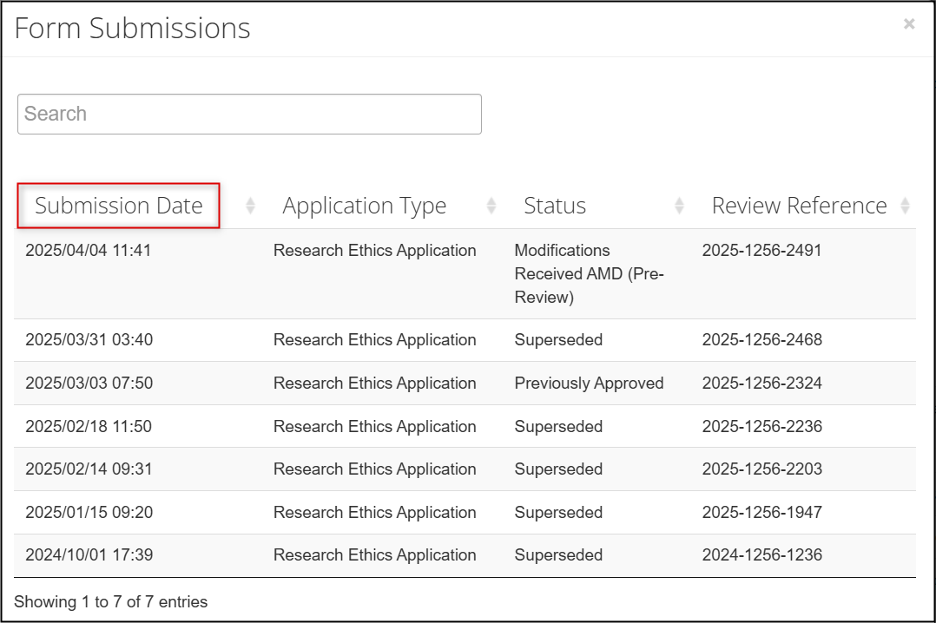
Accessing Latest and Previous Submissions
Unless it is a Legacy Data form, opening any EthOS form will always display the latest (most recent) version. However, you can always access a previous submission if needed.
- With the form launched in Timeline view, open the Form Submissions tile
-
Click once on the version you wish to open (in our example, let’s assume you want to open the previously approved version which happens to be two versions before the most recent one)
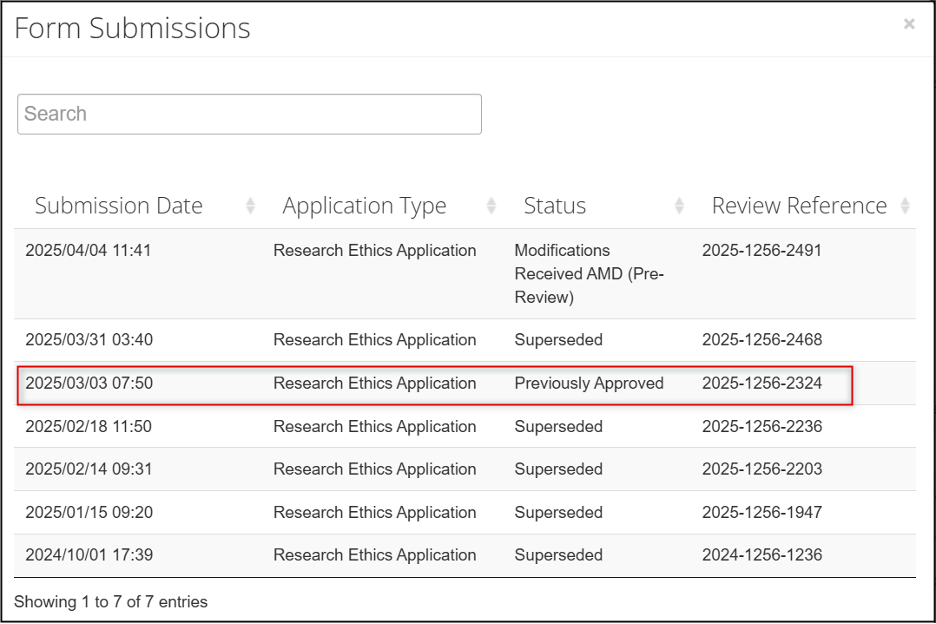
-
Now you are in the previous submission version’s Timeline view; notice that the header details have changed accordingly
-
From here, you can scroll to the bottom part of the Timeline page and see the list of actions taken for this version; some steps have related attachments that you may wish to read (for example, what was included in the Approval certificate, or what reasons the applicant gave for submitting the amendment)
-
You can also click on the Review Application tile to read or access this particular version’s contents, documents, or comments
Note: When you open Panel Comments of a form that has multiple resubmissions, bear in mind that the total number of comments (in our example, 45) could be distributed between the ‘current’ version (the version you have opened), the previous version, and all previous versions before that. The Current, Previous, and History tabs will divide the comments accordingly. In our example, the 45 Panel Comments are dispersed as:- 0 in Submission 5
- 6 in Submission 4
- 39 in Submissions 1-3
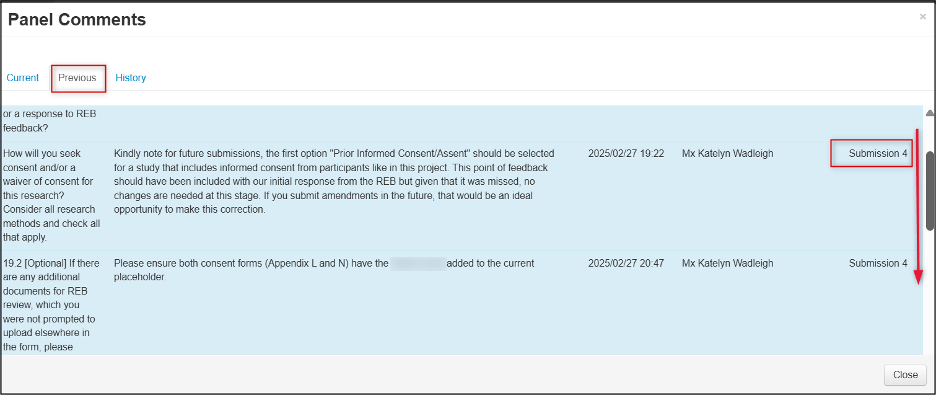

-
To return to the latest version of the form, click on the Timeline tile, open the Project tab, and click on the form to reset it to the latest submission (in our example, Version 7)

Reviewing an Application and Adding Comments
To begin a review of any assigned application you must start from the Timeline view. This is the default view if you have opened the application from your email link or Delegated Reviews tile.
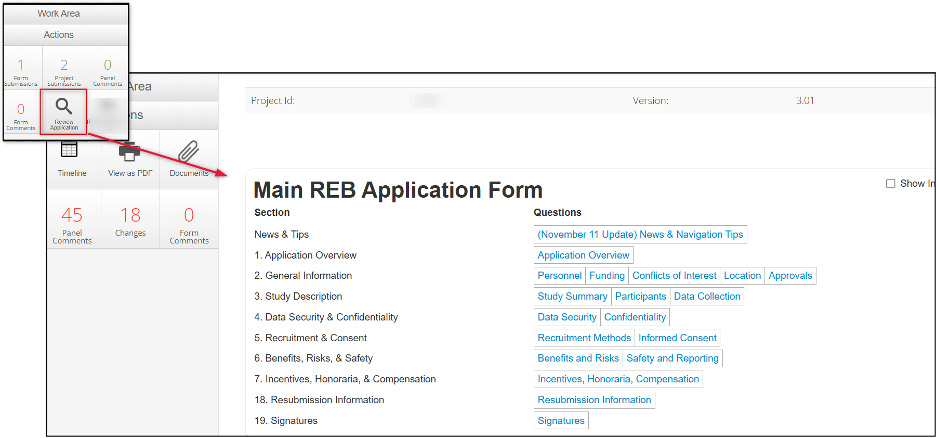
Click on the Review Application tile in the action pane on the left of the screen.
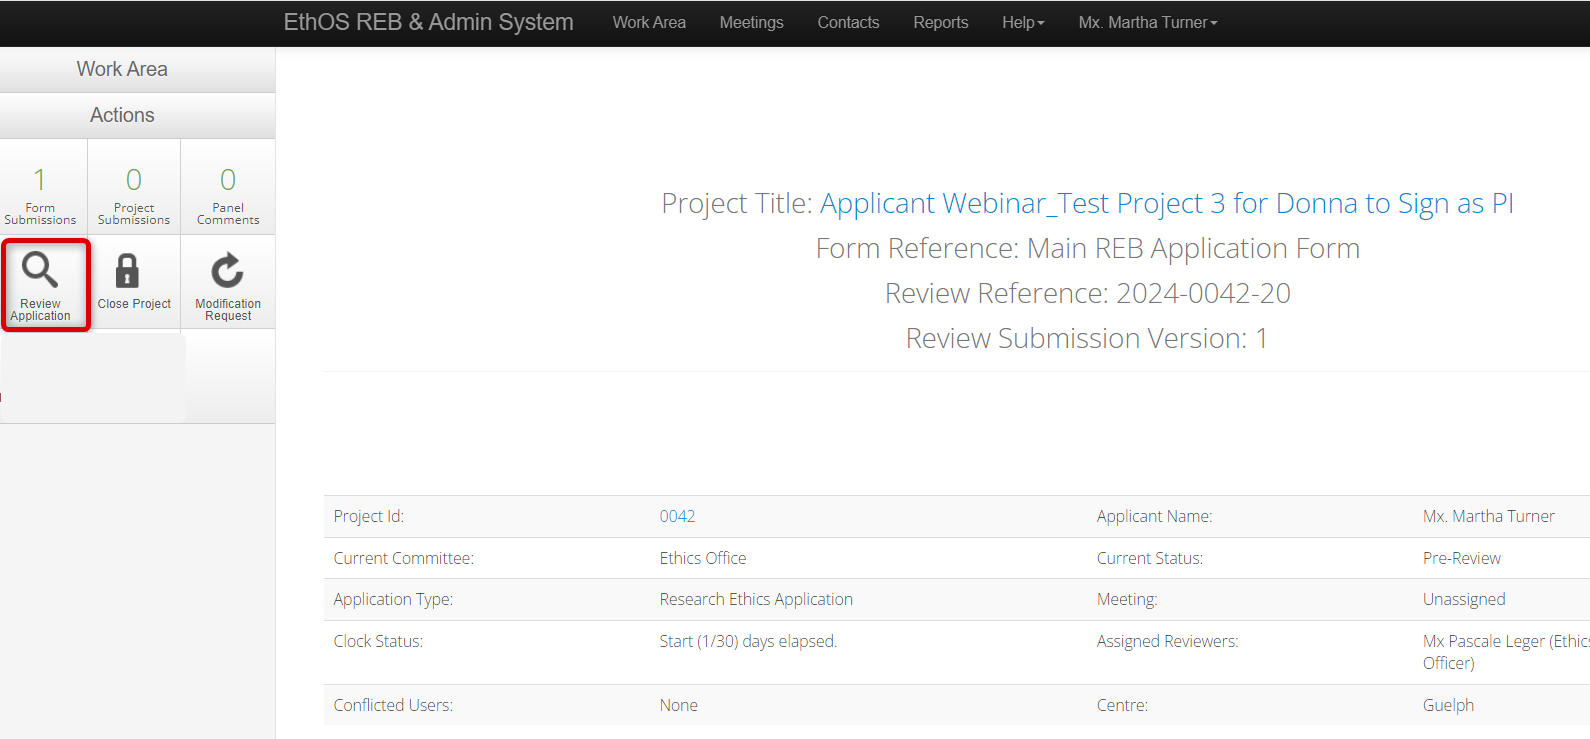
The next screen displays the Main REB Application Form overview. Here you see all the sections and pages that have been dynamically created by EthOS based on the applicant’s responses to question prompts.
Take a moment to understand the scope of the application. You can also toggle the Show Inactive Sections option to see which sections are not included in the application.
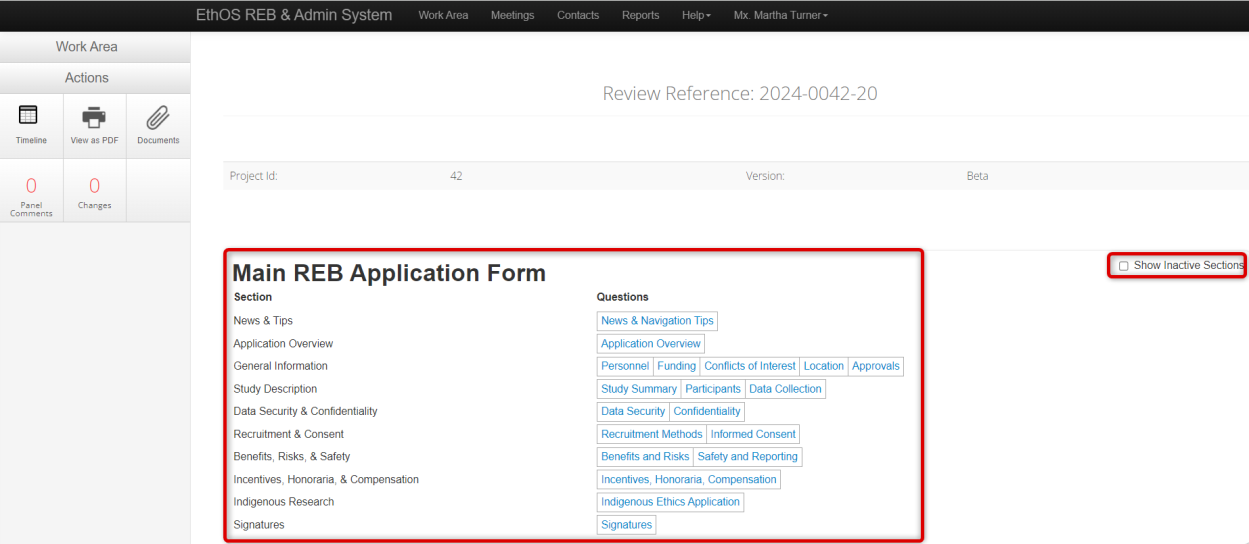
Before you begin, it is important to know how to move through the application’s pages once you open each section as there are different use cases for either option.
- Use the Previous and Next buttons to move backwards or forwards one page at a time
-
Use the Navigate button to first return to the Main REB Application Form overview page but then jump to a specific page
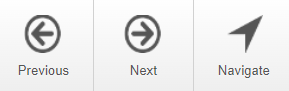
- Note: There are times when the Navigate button is more appropriate or useful, especially to skip between sections if you are comparing information. Otherwise, you will find it most helpful to review the application page by page using the Previous and Next buttons.
Now you are ready to begin reviewing the content in more detail.
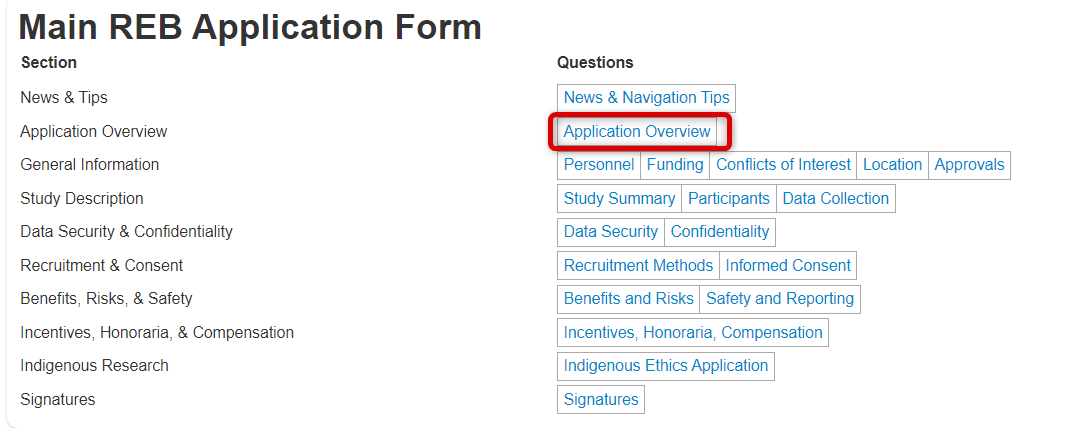
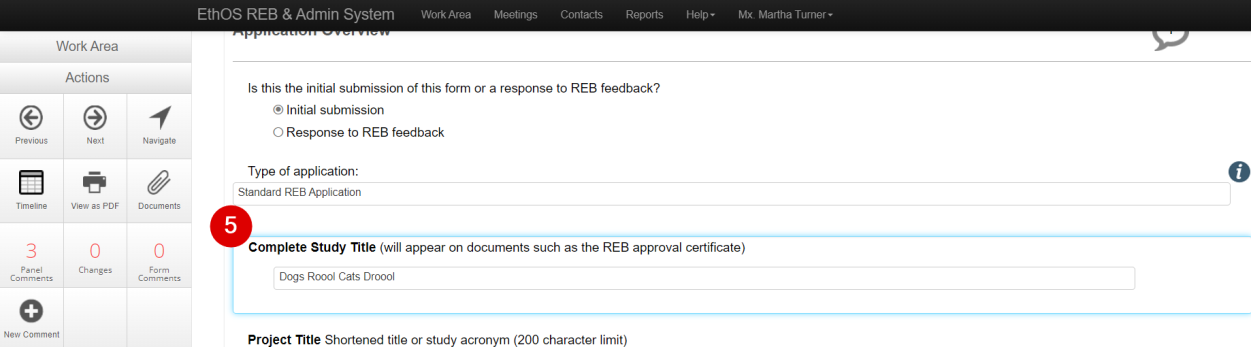
Application Overview Section
From the Main REB Application Form screen, click once on the Application Overview link to open the application’s initial summary-level contents. You should always start with the Application Overview because it provides all the initial information about what type of research is involved.
As you review the application, you will notice that all fields within the Main REB Application Form are greyed out and not editable by the reviewer.
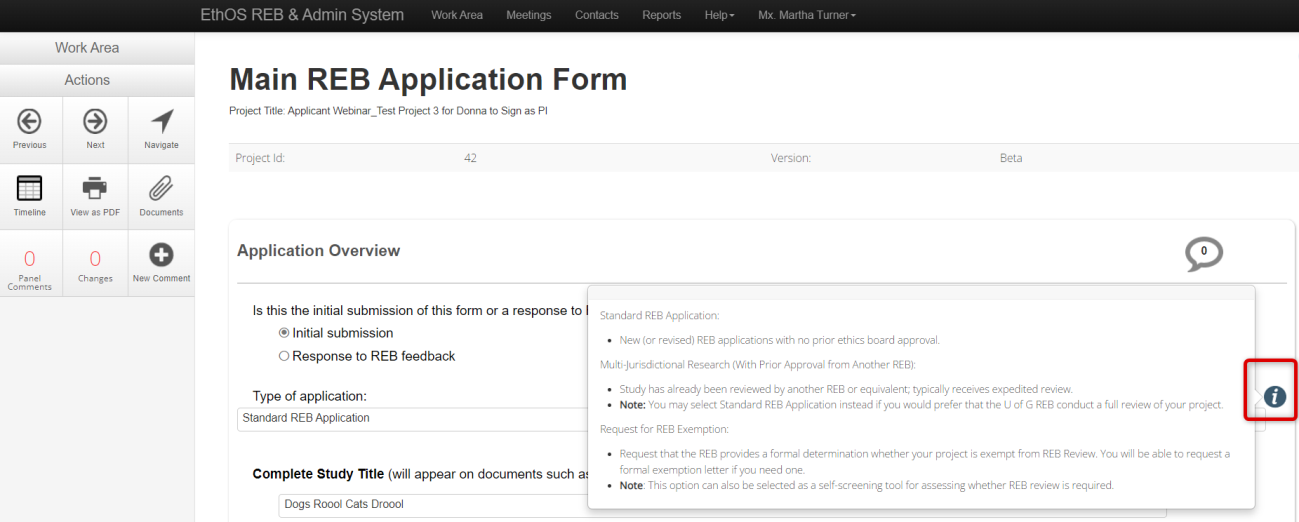
Reminder: Built-in guidance is available every time you see an Information icon. Click once on it to read the guidance provided. Please leverage these icons as many helpful details have been added to assist both applicants and reviewers.
Overview of How Comments Are Captured in EthOS
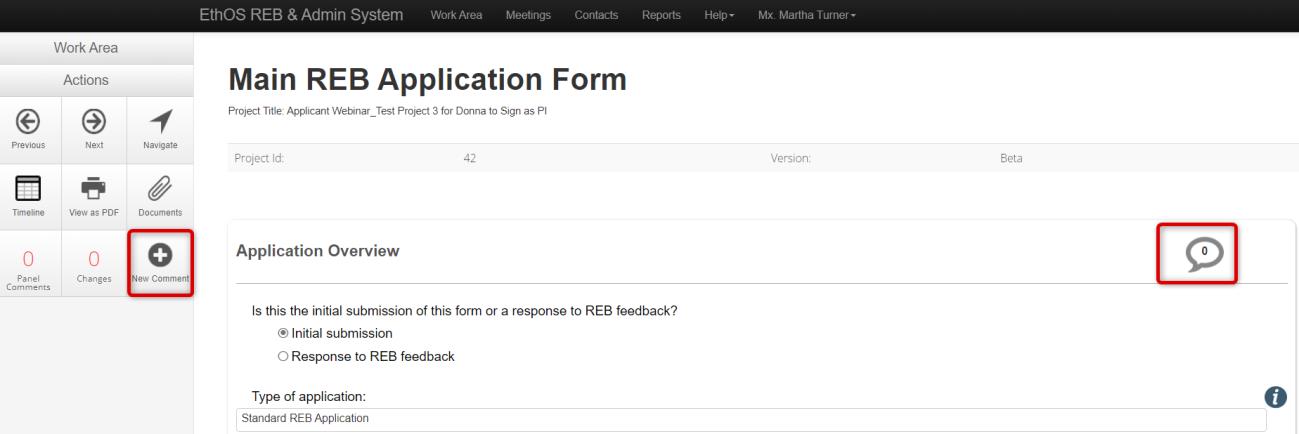
Reviewers can add comments to the application to capture their notes during the review process. After clicking on a section to review, the New Comment button becomes available in the action pane on the left of your screen.
Wherever you see the Comment bubble, you will be able to provide comments on each of those questions in that panel. You can choose to make your comment visible to the applicant or not. Prior to completing your review, you will have the opportunity to review all your comments, change the visibility if desired, amend or delete them, or even return to the application to add more comments.
Note: Even if you mark each comment as being visible to the applicant, the Research Ethics office reviews, moderates, and amalgamates feedback across all reviewers before sharing the final consolidated feedback form with the applicant.
At the end of the review, you will also have a final opportunity to share additional feedback about the application (or your recommendation) as a whole. This commentary is only between yourself and the Research Ethics office and is never shared with the applicant.
Adding Comments
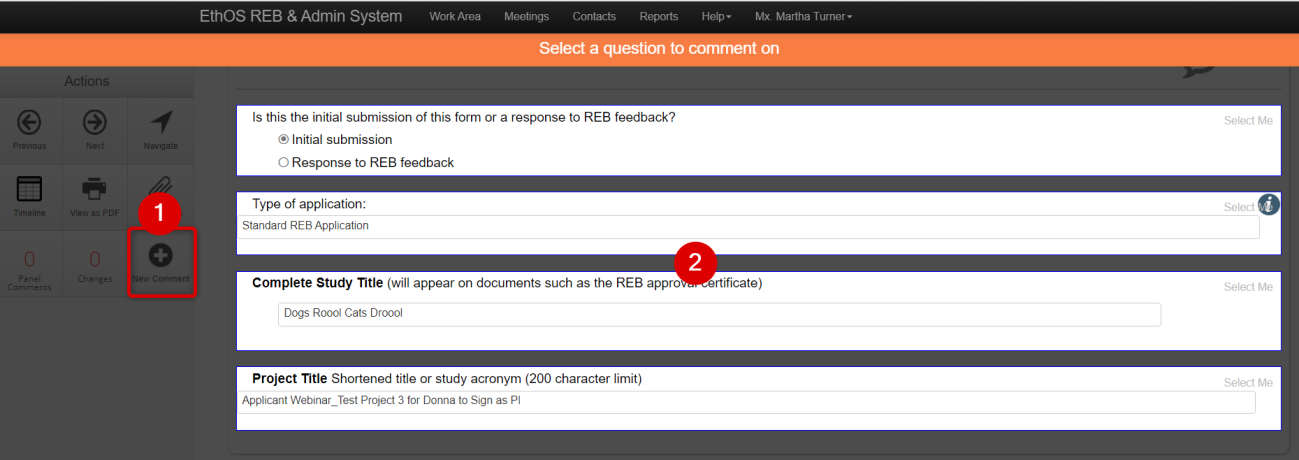
To add a comment during the review process:
- On any of the application’s pages, click on the New Comment button
-
Click once anywhere in the white area of the question on which you wish to comment
- Note: if your comment is related to an uploaded document, select the question to which the document is associated
-
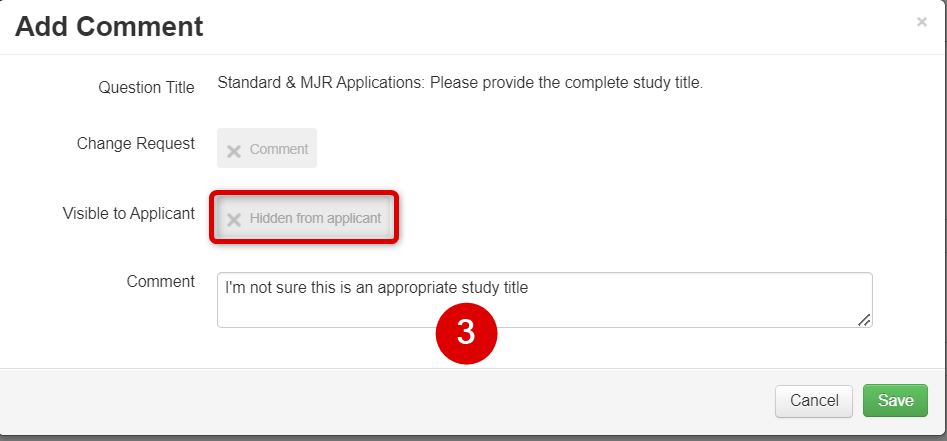
In the Add Comment pop-up window, enter your comment and then decide to make the comment visible (or not) to the applicant; the default setting is for comments to be hidden from the applicant. Hidden comments can be used to make notes to the Research Ethics office, while comments intended for the researchers should be made visible.
-
Alternatively, click on the Hidden from applicant button to toggle the setting to the green To be made visible to the applicant option
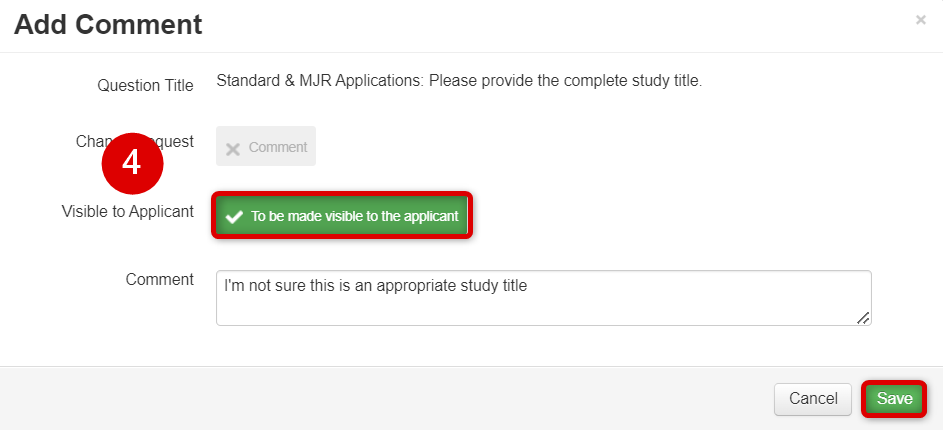
- Note: clicking on the button again will toggle visibility back to hidden
- When you have finished entering your comment and setting the desired visibility, click on the Save button
-
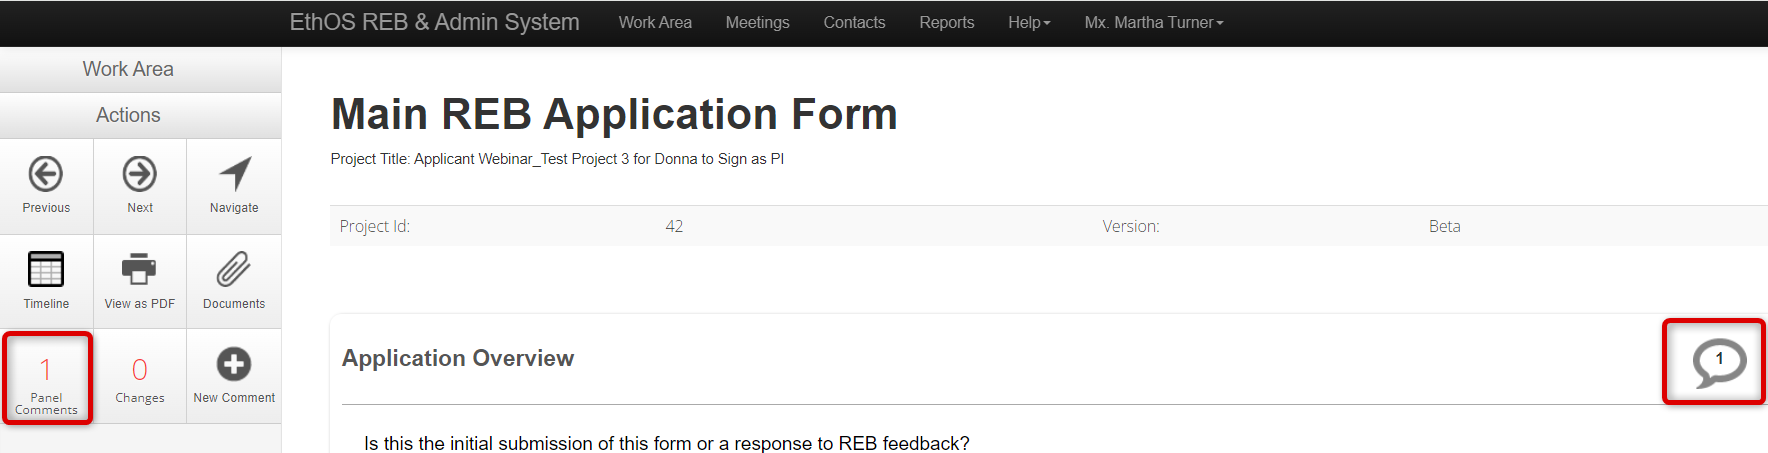
As you add comments, EthOS will update the count in the Panel Comments tile and in the related Comment bubble beside the section/question
Viewing, Editing or Deleting Comments
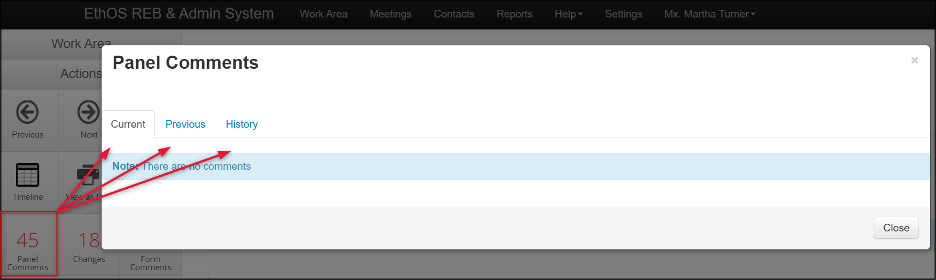
To view the collected set of comments for an application, click on the Panel Comments button in the action pane on the left side of your screen.
Within the scrollable list of Panel Comments, reviewers can:
-
Remind yourself of which comments you made visible or hidden
- Note: you can change the visibility here for each comment or set all comments to be made visible to the applicant
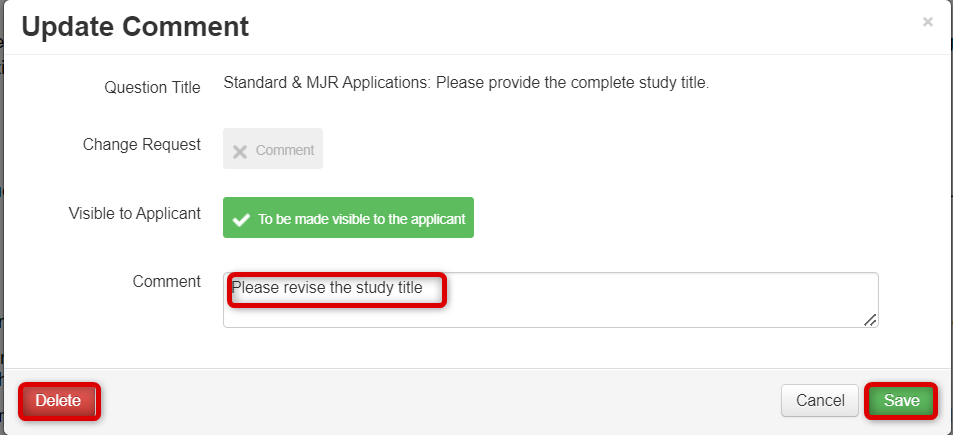
-
Edit each comment if needed
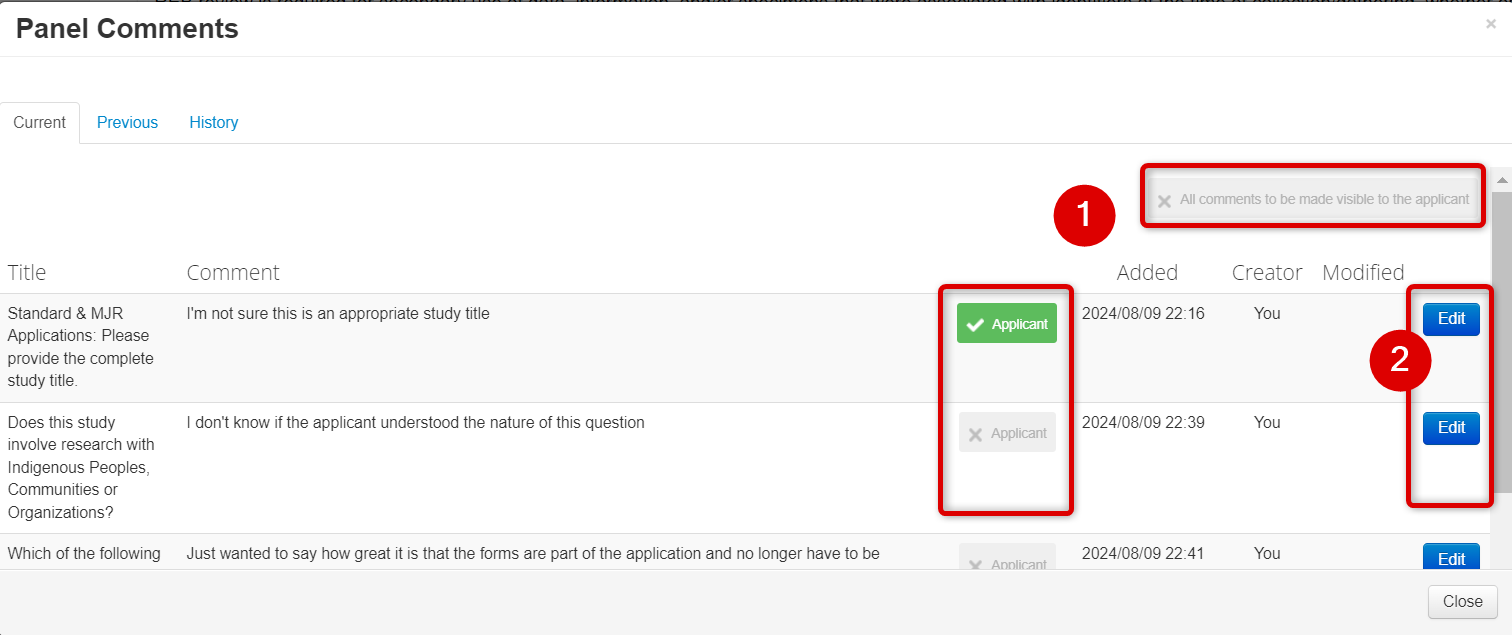
-
To edit or delete a comment, click on the Edit button to open the Update Comment pop-up window
- Revise the comment and click on the Save button
- Or, to remove the comment, click on the Delete button
Note: If you edit a comment, your name and timing details appear in the Modified column for visibility to who made the last change. Please do not change or delete comments from other reviewers. You can always add a new comment (marked as not visible to the applicant) if you wish to suggest an edit to someone else’s content.
You can also navigate from within the Panel Comments window back to the original question to which the comment is associated.
-
Click on the Title of the question
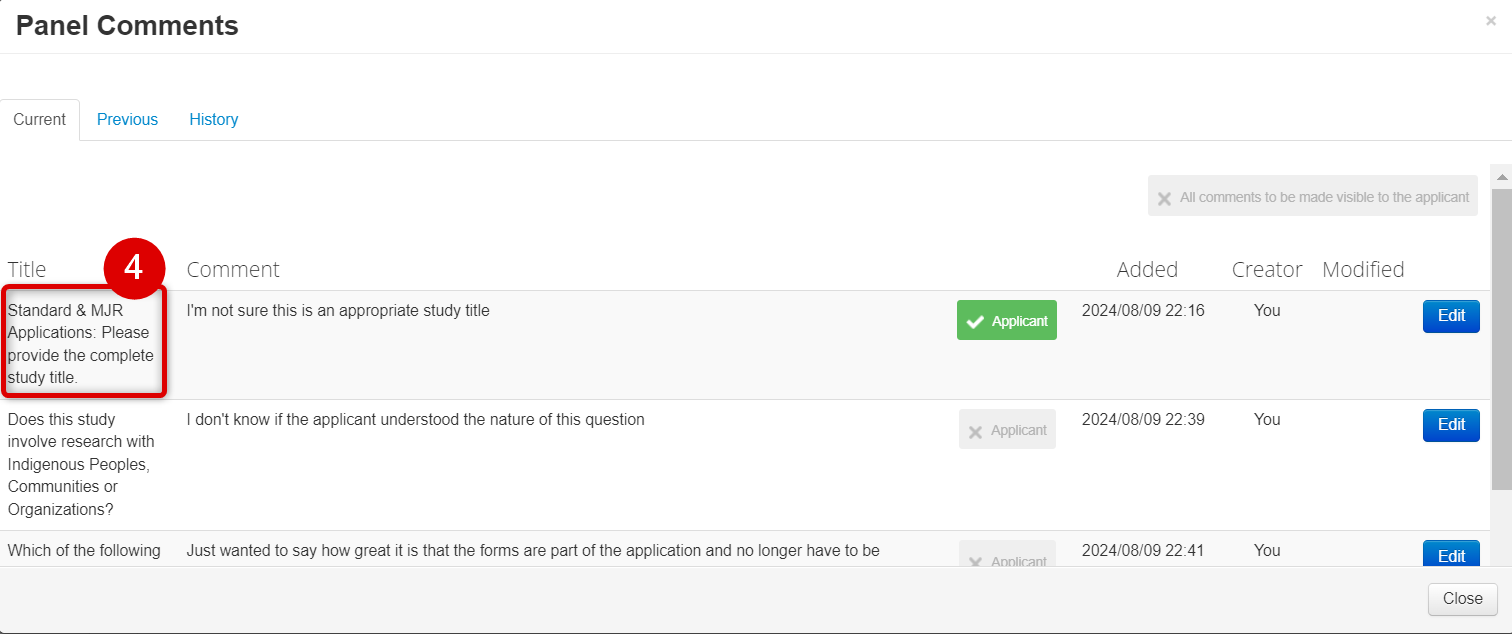
-
EthOS opens the specific section of the application to which the comment applies
- Note: if you are now in a different area of the application form, remember that you can use the Navigate button to jump back to the page you were on when you opened the Panel Comments, or you can click on the Panel Comments button again to continue reviewing your comments
Marking a Review as Done
Continue working your way through each page of the application until you arrive at the Signatures page. This is your cue to know that you have reached the end of the application.
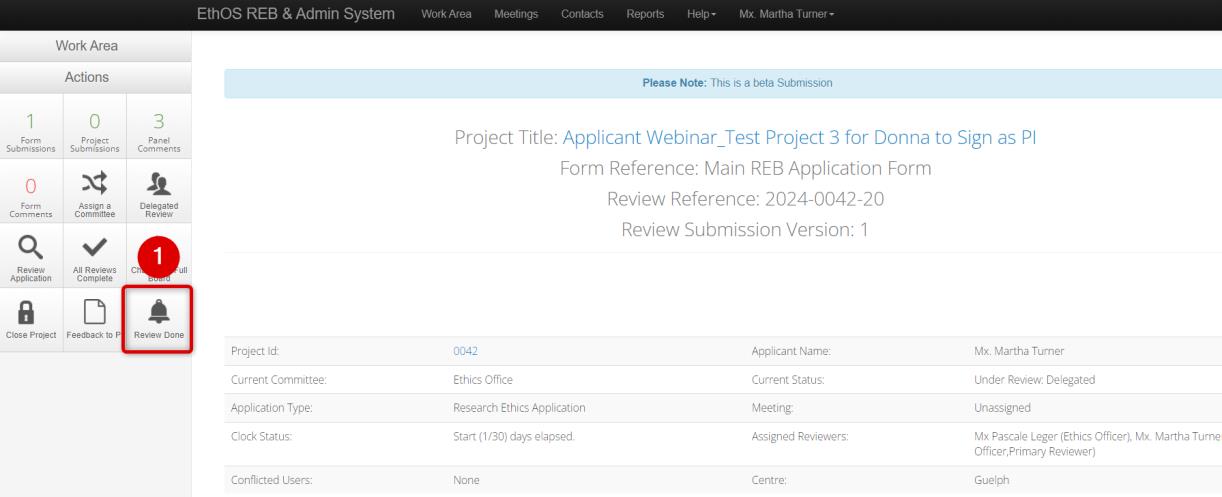
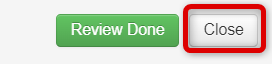
If you are ready to mark your review as complete (done), you must return to the Timeline view. You cannot trigger the Review Done step unless you are in the Timeline View.
To return to the Timeline view from the Signatures page, click on the Timeline tile in the action pane on the left side of your screen.

Make your Recommendation and Provide Final Comments
To begin the final steps in your review:
-
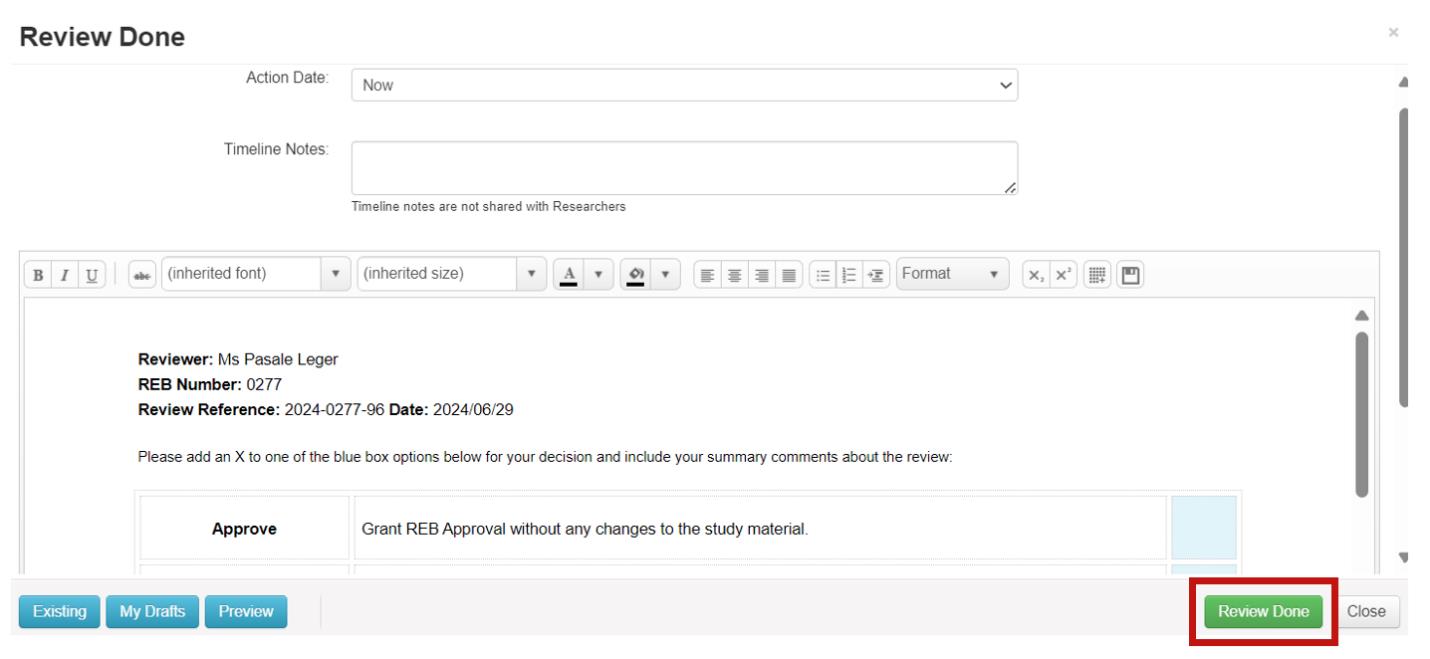
From the Timeline view, click on the Review Done button
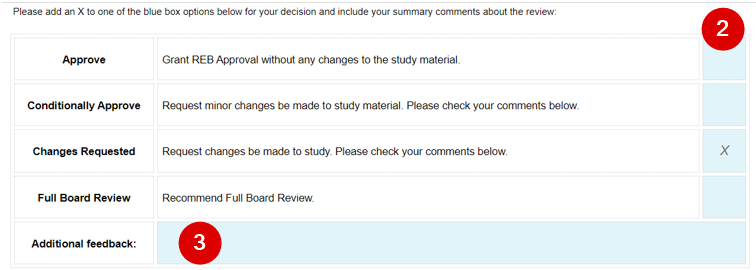
- In the Review Done pop-up window, scroll through the table and indicate your recommendation with an X
-
You can also provide any final additional comments about the application as a whole (additional feedback here is intended only for the Research Ethics office)
-
Continue scrolling down to see the summary table of all the comments made during the review, with a recap of which ones you made visible to the applicant
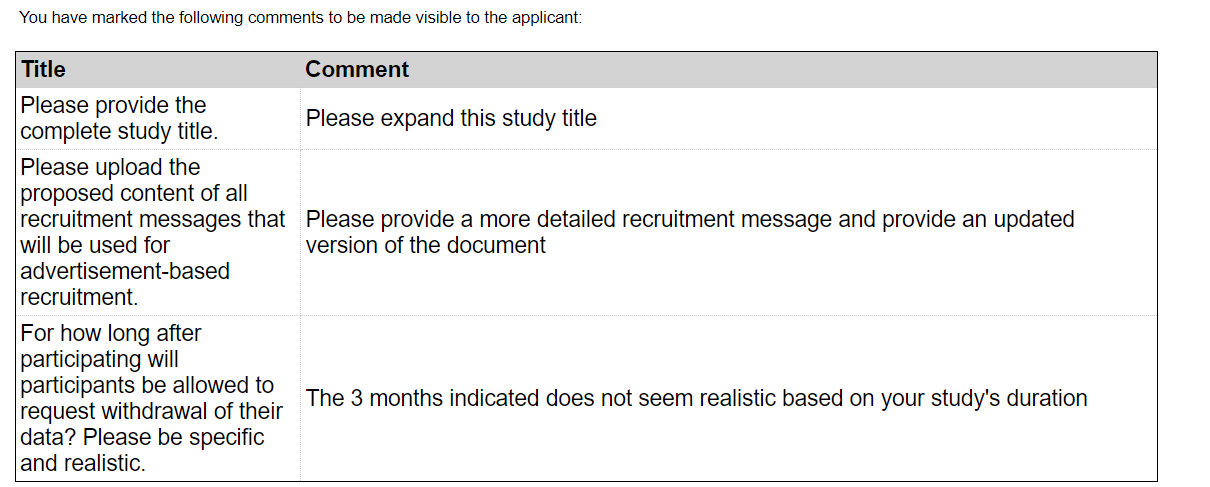
- Reminder: the Research Ethics office reviews, moderates, and amalgamates all reviewer feedback (marked as visible) prior to providing a consolidated report to the applicant.
If you wish to make any changes at this point, see the next section. Otherwise, proceed to the Ready to Mark your Review Done instructions further below.
Not ready to Mark your Review Done?
-
If you are not ready to mark your review as done (e.g., you wish to change one of your comments), close the Review Done pop-up window
- Note: closing the window will clear any previously entered content in the table such as a recommendation or comments
-
You will return to the Timeline view from which you can:
- Click on the Review Application button to revisit certain sections
-
Click on the Panel Comments button to revisit (and edit or delete) comments
- Note: to add new comments, navigate to the desired section and click on the Add Comment button from the action pane
- When you have made your final adjustments, return to the Timeline view and click on the Review Done button
- Make your recommendation and final comments as per the steps outlined in the previous section
Ready to Mark your Review Done?
Once you are satisfied with your recommendation, and have added any final comments about the overall application, click on the Review Done button
Answer Yes to the confirmation message.
You have now completed your review. Thank You!
Review Done Confirmation
Once you have marked your review as done, you are copied on the automated notification sent to the Research Ethics office.
Reminder: Review comments at this stage have only been sent to the Research Ethics Office, not the applicant.
The Timeline view is updated to reflect the date and time when the review was completed. Both the email notification and the consolidated review form are accessible from the related Review Done row.
Important: Your Delegated Reviews Tile Number
The submission you just reviewed will remain as a count in your Delegated Reviews tile until the Research Ethics office has marked that the review cycle is complete (which will not be immediate). At this time, the application will move from the Delegated Reviews tile to the History tile on your Work Area.
Until this happens, REB Members who wish to confirm that no further action is needed on their part have a few options:
- The automated email that you receive after marking your review as done is your official confirmation step. You can double-check that you received this email in your inbox, or in the Notifications tile.
- Open the application and look for the Review Done step in the Timeline view.
-
You can also ‘force’ your Delegated Reviews count to drop by manually checking off the row for application you have reviewed:
-
Open your Delegated Reviews tile and click the green checkmark beside the reviewed application; the row will turn from yellow to grey (which can be your visual cue/reminder that no further action is needed)
-
Return to your Work Area and manually refresh your Delegated Reviews tile; the count will reduce accordingly.

-
Open your Delegated Reviews tile and click the green checkmark beside the reviewed application; the row will turn from yellow to grey (which can be your visual cue/reminder that no further action is needed)
Reviewing Applications after Requested Modifications
Based on your feedback, if modifications have been requested, the application will be resubmitted. Typically, the Research Ethics team will review the resubmission. However, if you are asked to review the modifications, e.g., for a Full Board reviewed protocol, the process for your review of resubmissions is the same as an initial application. However, as you review the contents, you will want to understand how the applicant has responded to any requested modifications.
- As with an initial application, you receive an email and an EthOS notification when a review is required
-
In the Application Overview section, note that the applicant will have indicated that this is a response to REB feedback
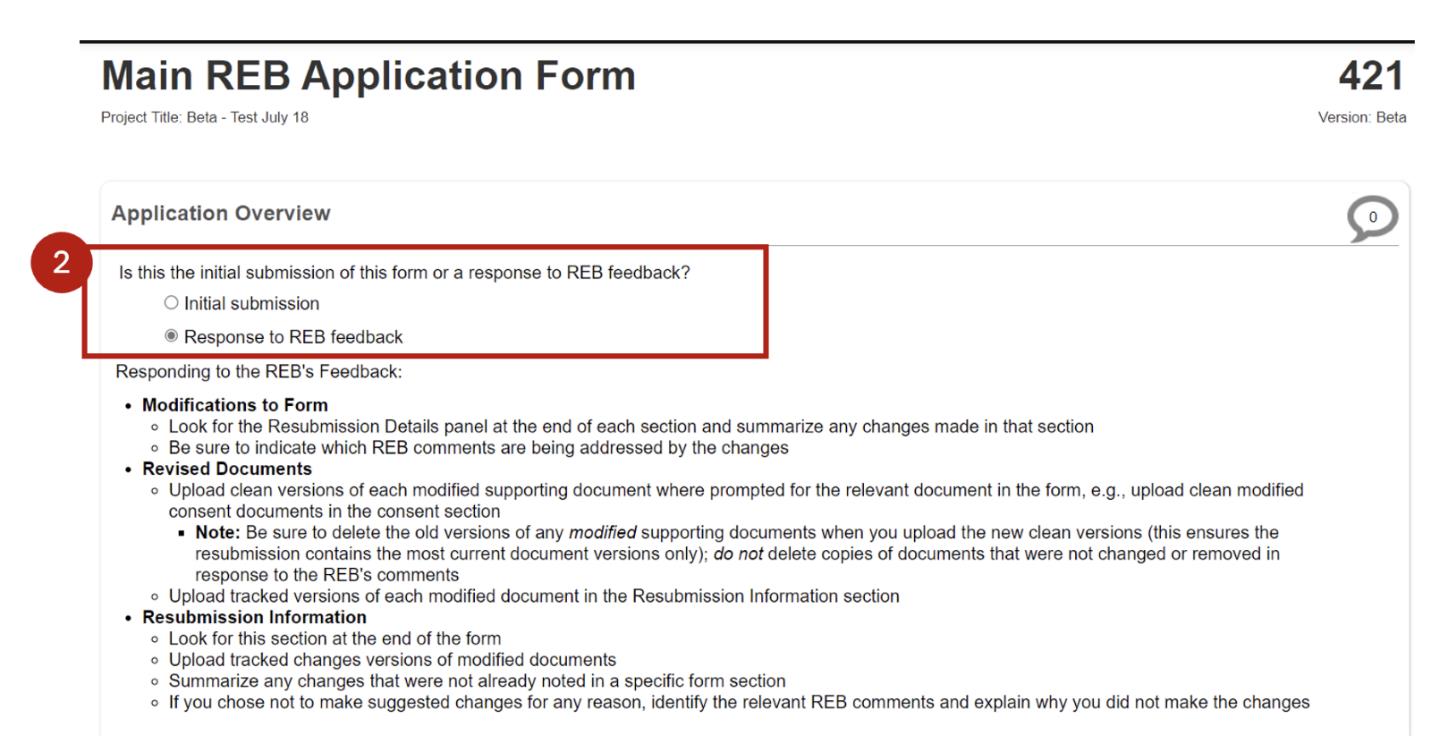
-
The applicant will have summarized how they addressed feedback

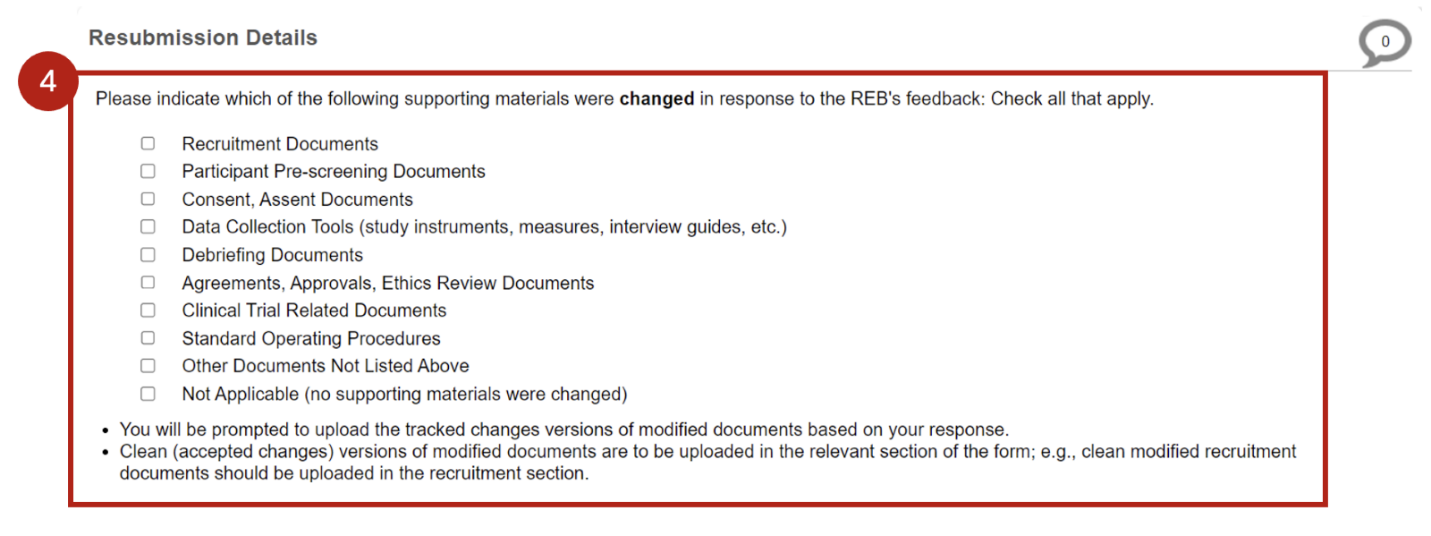
-
Further, the applicant will have indicated what supporting materials may have changed
-
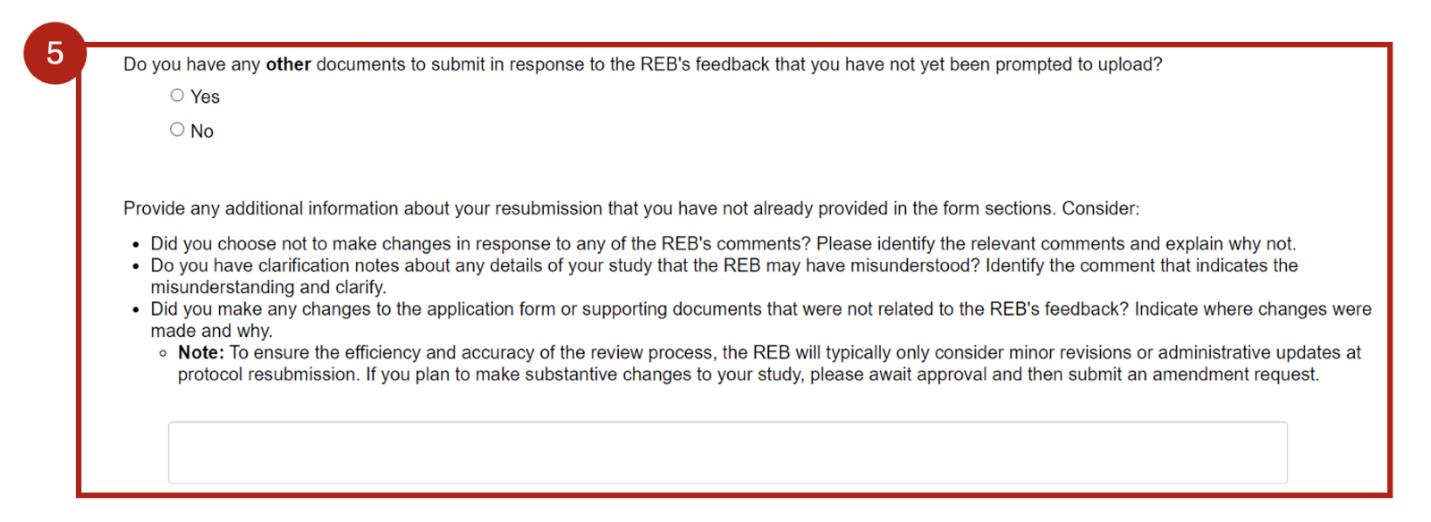
The applicant may have attached additional documents and may also have provided closing commentary or details about their response.
- Review the application, adding any additional comments, make your recommendation and mark your review as done – in the same way as you did with the initial application.
See below for two useful features that will make it easier for you to compare changes between the resubmitted and previous content.
Viewing Changes Between Submissions (Tracked Changes Feature)
EthOS has a tracked changes feature which allows you to compare current and previous content in an application. This helps you quickly isolate what has been removed, added, or edited as you complete your review of the resubmission.
If the application you are reviewing is a resubmission:
- EthOS displays the total number of changes made in the application in the Changes tile, and
-
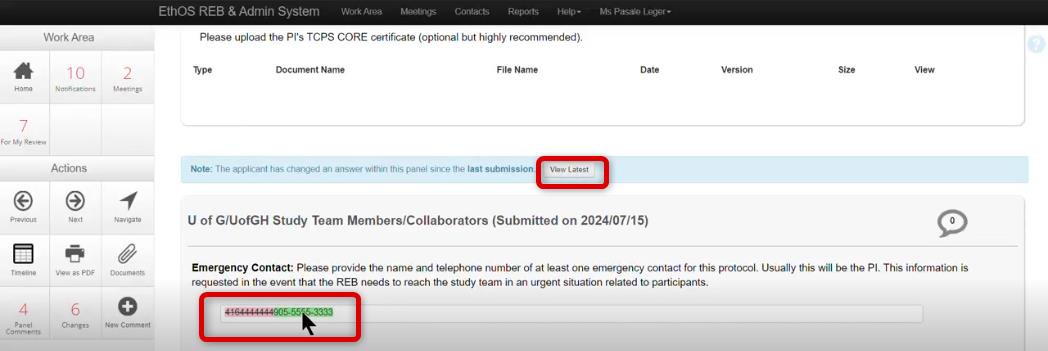
As you page through the application, a blue bar will inform you when/if a section has changed; here you will have the option to toggle between a View Changes mode or stay in the View Latest (current) mode
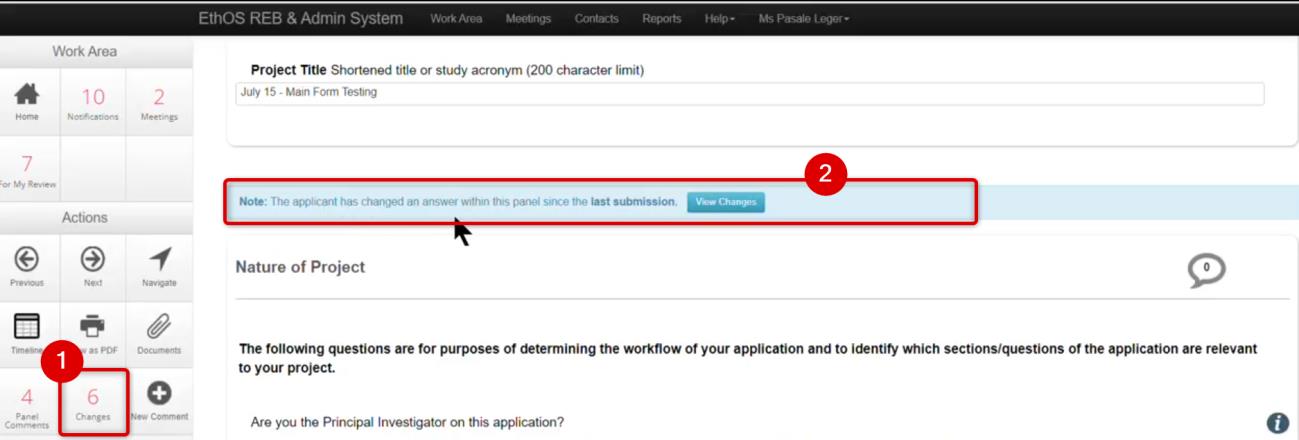
-
Activating View Changes turns on a track changes display where:
- content highlighted in green is new/changed in the latest submission
- content highlighted in red has been removed from the latest submission
Example of Viewing Changed Content
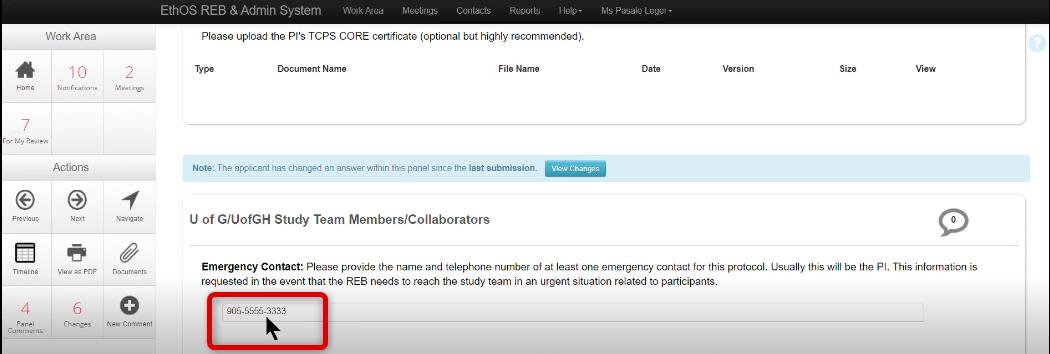
In the below scenario, the phone number has been updated since the original submission. After activating View Changes mode, the deleted phone number is highlighted in red and the new phone number is highlighted in green.
Clicking the View Latest button restores the content to only showing the latest version, which includes only the new phone number.
Video Recap: Viewing Changes Since Last Submission
The below video shows a reviewer toggling between Viewing Changes since the last submission and restoring the View Latest (current) version.
Viewing Changes between Previous Submissions and Approved Submissions
After an application has been approved, any amendments trigger another review cycle. And, again, the applicant may need to resubmit the amendment in response to requested modifications.
For post-approval scenarios, EthOS allows you to specify the comparison range when viewing the changes. Let us use an example to show how this works:
- Note: The use of version numbering in the table below is only to support the explanation; EthOS does not apply version numbers to applications.
| Application Scenario | Version # |
|---|---|
| An application is approved | 1 |
| Applicant amends the approved version and submits for review | 2 |
| Modifications are requested prior to approving the amended content; the applicant makes those changes and resubmits | 3 |
When you activate the View Changes feature while reviewing the most recent submission (in our example, Version 3), you will have the option to:
View Changes since Last Submission (e.g. between Versions 3 and 2), or view Changes since Previously Approved Version (e.g. between Versions 3 and 1).

Adding and Comparing with Previous Comments
Reviewers can continue to add comments in resubmitted applications. EthOS tracks the comments entered on a previous submission as well as comments entered in the latest version. This provides useful traceability to what was mentioned or commented upon previously and can help avoid any unnecessary repetition or contradiction in the commentary threads.
Video Recap: Navigating Between Current, Previous, and Historical Comments
The video below demonstrates how current, previous, and historical comments are available from the Panel Comments tile in resubmitted applications.
Preparing for a Full Board Meeting
As of May 2025, REB Members can now access their Full Board meeting materials directly in EthOS.
Here is an overview of how the Ethics Office will leverage EthOS functionality to support Full Board meeting logistics:
- Agendas will continue to be compiled and agreed upon with the REB Chairs as per current process (via email)
- Calendaring and acceptances will continue to be managed in Outlook
-
The Outlook invitation will include a link to an EthOS Meeting page, where you will be able to find links to the applications being reviewed and any other meeting documents approximately one week before each board meeting
- To support a transition period, all applications and meeting documents will continue to be uploaded to CourseLink and OneDrive until September 2025
- REB Members will always be notified by a separate email once meeting documents are available
- The Ethics Office will continue to confirm (via email) if an REB Member can present an application; once confirmed, this application will also be accessible via that member’s EthOS Presentations tile
-
Applications will be reviewed and the Ethics Office will consolidate/finalize the feedback comments (using the EthOS comment feature) as per current process
- Important: REB Members should not add any of their own comments while previewing EthOS applications assigned to the meeting. Please make any notes offline. Your comments will be collected at the meeting after which the Ethics Office will enter them into the application on the REB’s behalf.
- The Ethics Office manually adds attendees to the EthOS Meeting page after the meeting is held, based on actual attendance
- After approval, meeting minutes will be uploaded to the EthOS Meeting page in which they were taken
Using your EthOS Meetings Tile
As Full Board meetings are created, they will appear in your Work Area Meetings tile (and also via the Meetings menu on the navigation bar).
![]()
or

Accessing Meeting Materials
-
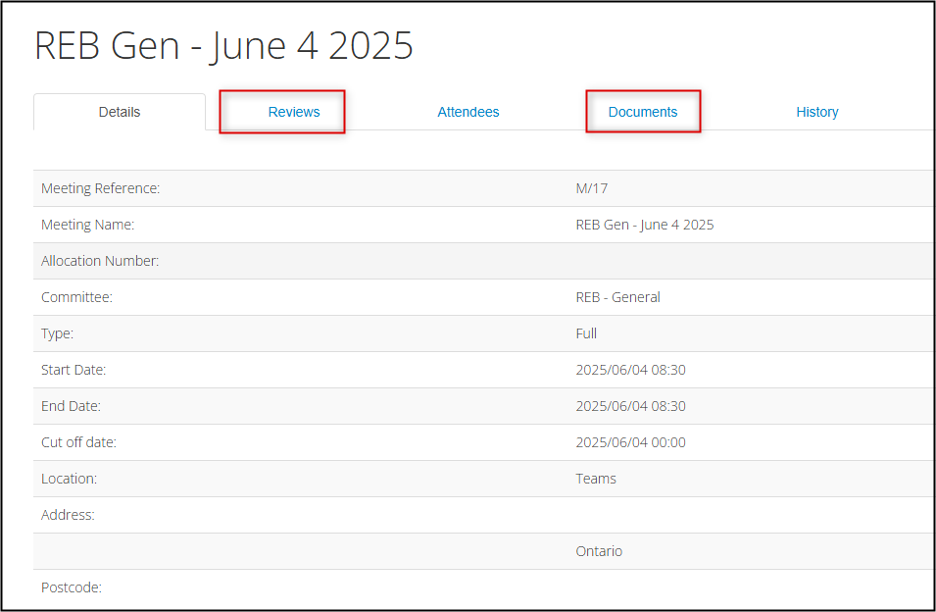
Click once on the desired meeting row to open the Details page; from here you can open:
- The Reviews tab to see a list of the applications allocated for Full Board review
- The Documents tab to access either the Agenda, Draft Minutes from the previous meeting, or other meeting documents
Note: REB Members should continue to confirm their attendance via Outlook. The Ethics Office will then add the names of attendees to the meeting based on actual attendance. Accordingly, the Attendees tab of the meeting will not be accurate until after a meeting has occurred. -
To access the planned review items for each meeting, click on the Reviews tab to display the list of all applications assigned to this meeting
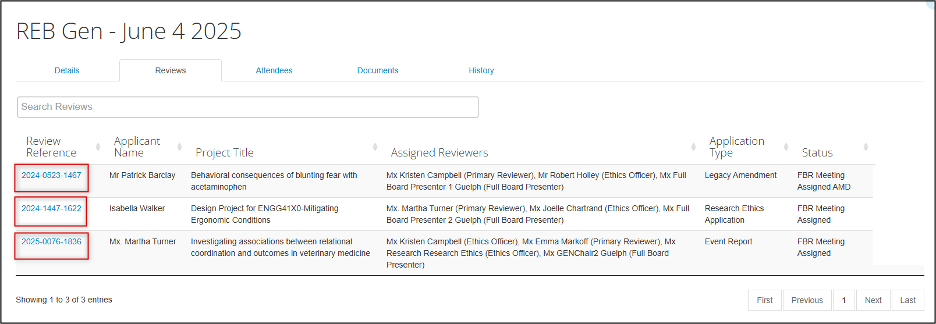
- Click on the Review Reference title to open the application’s Timeline view
-
To read the contents of the application, click on Review Application to launch the form’s main page
Important: as part of reading the application in advance of the meeting, REB Members can read any existing panel comments but should not add or edit any comments or take any further actions with the application at this time. -
When you have finished reading through an application’s contents, click on Meetings in the menu bar or expand your Work Area sidebar and click on the Meetings tile to return to the meeting details
Presenting at a Full Board Meeting
In the event that an REB Member is to present an application at a Full Board Review meeting, this material appears in your Presentations tile. You are also named as the Presenter on the Agenda.

Steps to Prepare for a Presentation
No specific system steps are required in order to prepare for your presentation. Open the application from the tile, read the contents, including study-related documents, and prepare your presentation notes outside of EthOS in your current fashion.
Important: REB Members will be able to see any existing comments in the application (from the Ethics Office review), but please do not comment on the application’s merit or add any other suggestions for the applicant at this time as these will be discussed collectively at the Full Board meeting.
After the Full Board meeting, and once the application is in a Full Board Complete status, the application will leave your Presentations tile and will be moved to your History tile.
Help and Support
Feel free to reach out to rebadmin@uoguelph.ca at any time, we are happy to help with anything you need!
For technical issues with EthOS, contact RAIMSsupport@uoguelph.ca and your question will be ticketed and triaged. Thank you for all you do to support our research community!